Contents
Atlassian Cloud OAuth Single Sign-On (SSO) Keycloak
Jira OAuth Single-Sign On(SSO) for Atlassian Cloud allows you to securely login using Keycloak credentials. Single Sign-on (SSO) into your Atlassian Access or Atlassian Jira Cloud Account with any of your existing OAuth Provider credentials for enhanced security using our module.
You can refer the steps to configure Multiple IDPs and Domain Mapping in Atlassian Access from the video or documentation given below
Pre-requisites
1. Atlassian Access Subscription
Atlassian Access is an additional subscription applied across the Atlassian cloud products like Jira Software, Jira Service Management, Jira Work Management, Confluence, Bitbucket, etc. So it is needed for Single Sign-On(SSO) or any Cloud Service which comes under Atlassian Access.
2. Domain Verification:
The first step of Atlassian Access starts with the Domain Verification Process to enforce SAML SSO on the managed user accounts. This process verifies that you own a valid domain for managing the user accounts and use the same domain name for the email addresses.
In this document, we will demonstrate the setup in two parts.
Part 1: Configure SAML SSO between Atlassian cloud as SP and miniOrange as IDP
Part 2: Configure SAML SSO between miniOrange as SP and Keycloak as IDP
Part 1 + Part 2 : Testing SSO between Atlassian cloud as SP and Keycloak as IDP using miniOrange Identity Broker.
Part 1: Setup miniOrange with Atlassian Access
Step 1. Setup miniOrange as an Identity Provider
- Login into miniOrange Admin Console.
- Go to Apps and click on the Add Application button.
- In Choose Application Type click on Create App button in SAML/WS-FED application type.
- Search for Atlassian Cloud (SAML) in the list.
- Enter the following values in the respective fields, you will receive these values after creating an app in Atlassian access. Refer this step.
-
Custom Application Name Any name would be fine SP Entity ID or Issuer You will receive after configuring Atlassian Access App ACS URL You will receive after configuring Atlassian Access App - Also make sure that Sign Response & Sign Assertion both options are turned ON. Then click on the Save button.
- Once the App is successfully Created, Select that App and then click on Metadata option to get app’s Metadata.
- Since we are using miniOrange as a Brokering Service in this solution, Go to Information required to authenticate via external idp section as highlighted, and Click on Show Metadata Details.
- After clicking on the Show Metadata Details button you can see the metadata details.
- In the left sidebar hover on Users then click on Users List
- Click on Add User and enter details to enforce Single Sign On(SSO) on that user.


Step 2. Setup Atlassian Cloud
- Now login to Atlassian Cloud Admin Console.
- Select your organization and then select the Security tab. Click on SAML Single Sign-On from the left sidebar.
- You can click on Instructions for different Identity Providers. It provides a help page for specific IDP and Attribute Names for Attribute Mapping.
- Here you will get the SAML Configuration Instructions for different identity providers as listed. Click on Got it.
- Click on Add SAML Configuration.
- You will be redirected to the Add SAML Configuration window. Enter IDP Entity ID, SSO URL and the public certificate. Click on the Save Configuration button.
- Now you will be shown SP Entity ID & SP ACS URL as shown below. These details will be needed in miniOrange app configuration. Now set up the Authentication Policies by clicking on the View Authentication Policies.
- Click on Add Policy.
- Enter the policy name and add the policy.
- Now under Single Sign-On, click on Enable Single Sign-On.
- Then click on the Members tab besides the settings tab and click on Add Members.
- Enter details and click on Add Members.


Step 3. Test Atlassian Cloud - miniOrange Configuration
- Go to Atlassian Login Page.
- Enter email and click on Continue. Then you will be redirected to miniOrange Login Page
- After logging into miniOrange, you will be successfully logged into Atlassian Cloud Dashboard
If you do not have any IDP, you can always go with miniOrange IDP.
Part 2: Setup miniOrange with Keycloak
Step 1. Configure miniOrange as SP in Keycloak
Obtain the following steps to get callback url.
- Go to miniOrange Admin Console.
- From the left navigation bar, select Identity Provider.
- You will get the callback URL here, keep it handy this would be required in next steps.

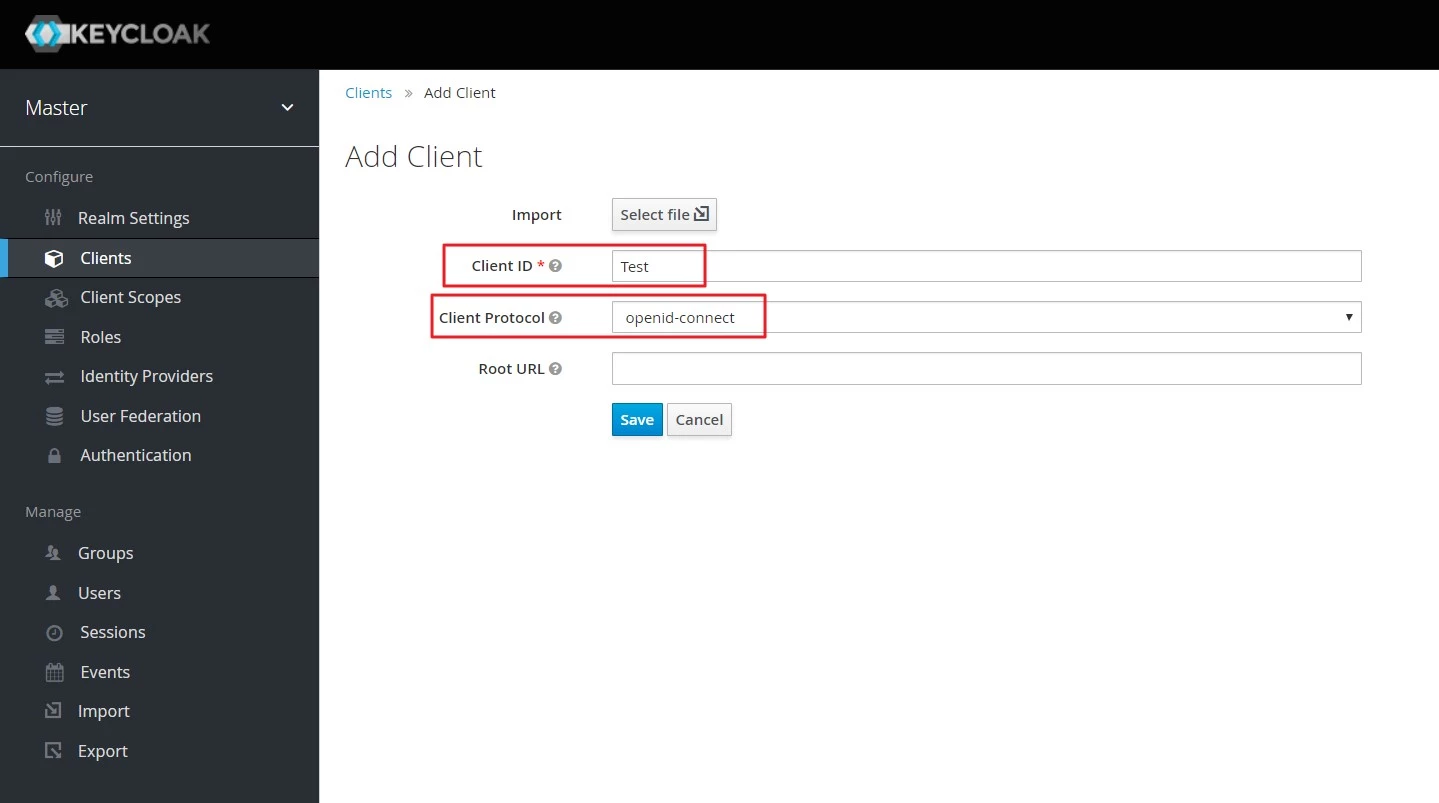
- Create openid client : Login to your Keycloak server. Go to the Clients and click on Create button. Enter client id and select openid-connect as client protocol and select Save.
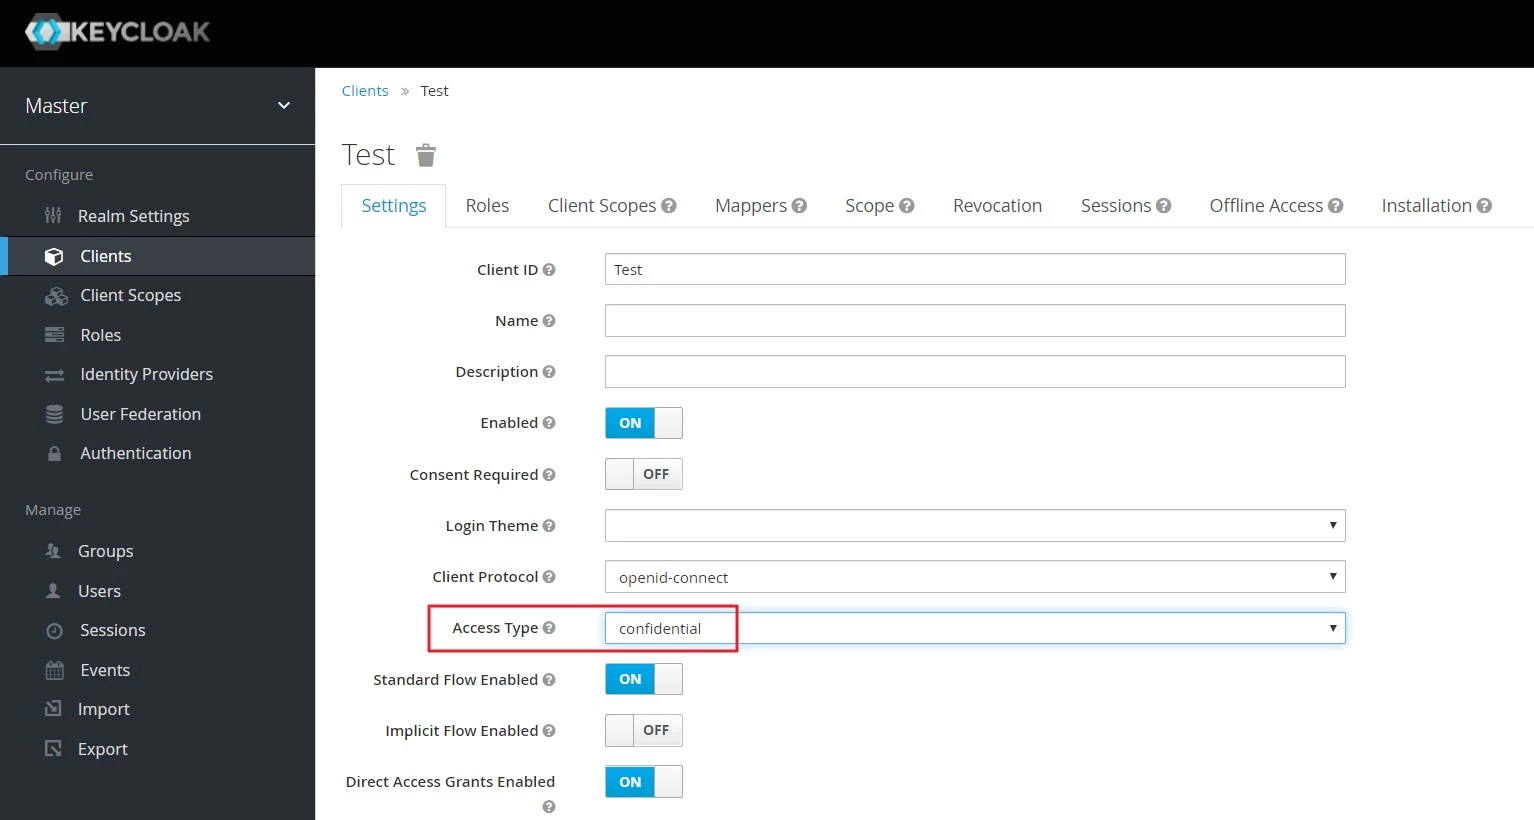
- Change Access type: After client is created change its access type to confidential.
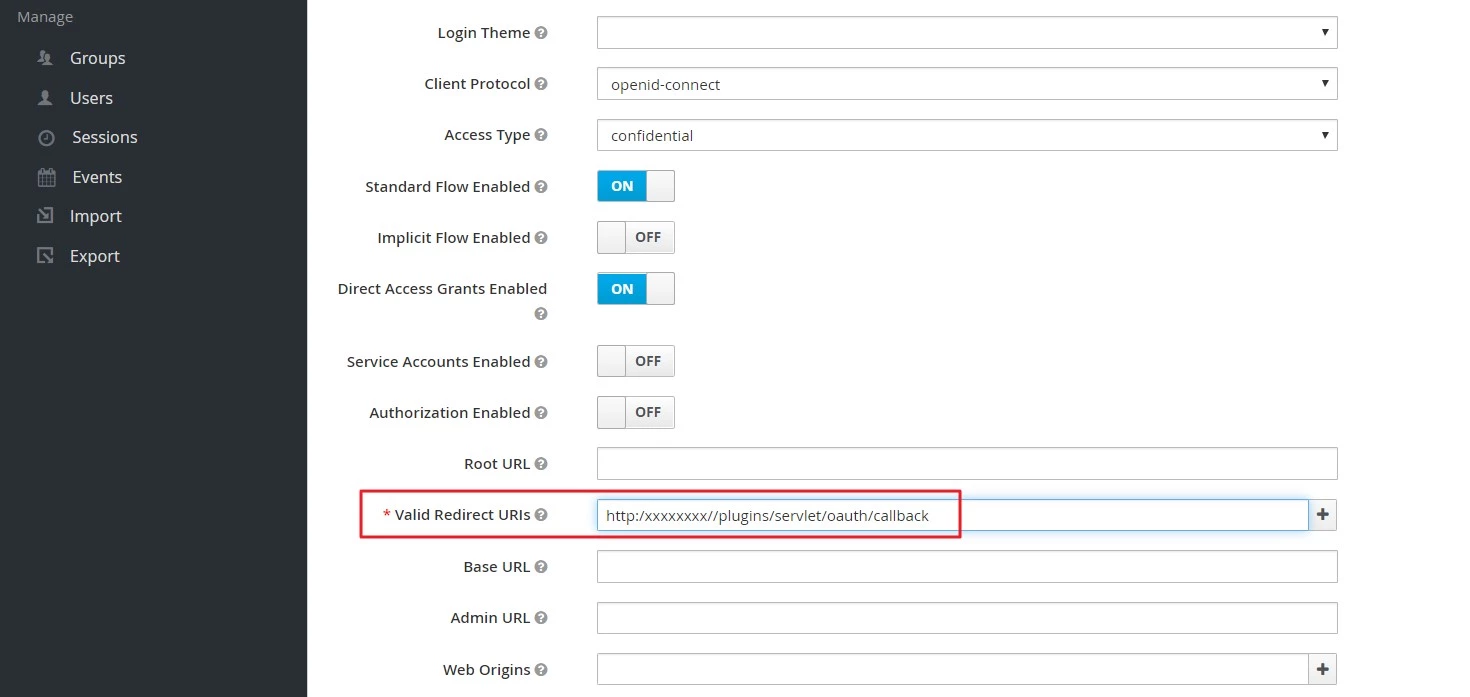
- Enter Valid Redirect URIs :
- Copy the Callback URL from plugin and insert into Valid Redirect URIs field.
- Click on SAVE.
- Keycloak Group Mapper:
- Now, if you want to fetch the user groups you will have to map the client and group membership.
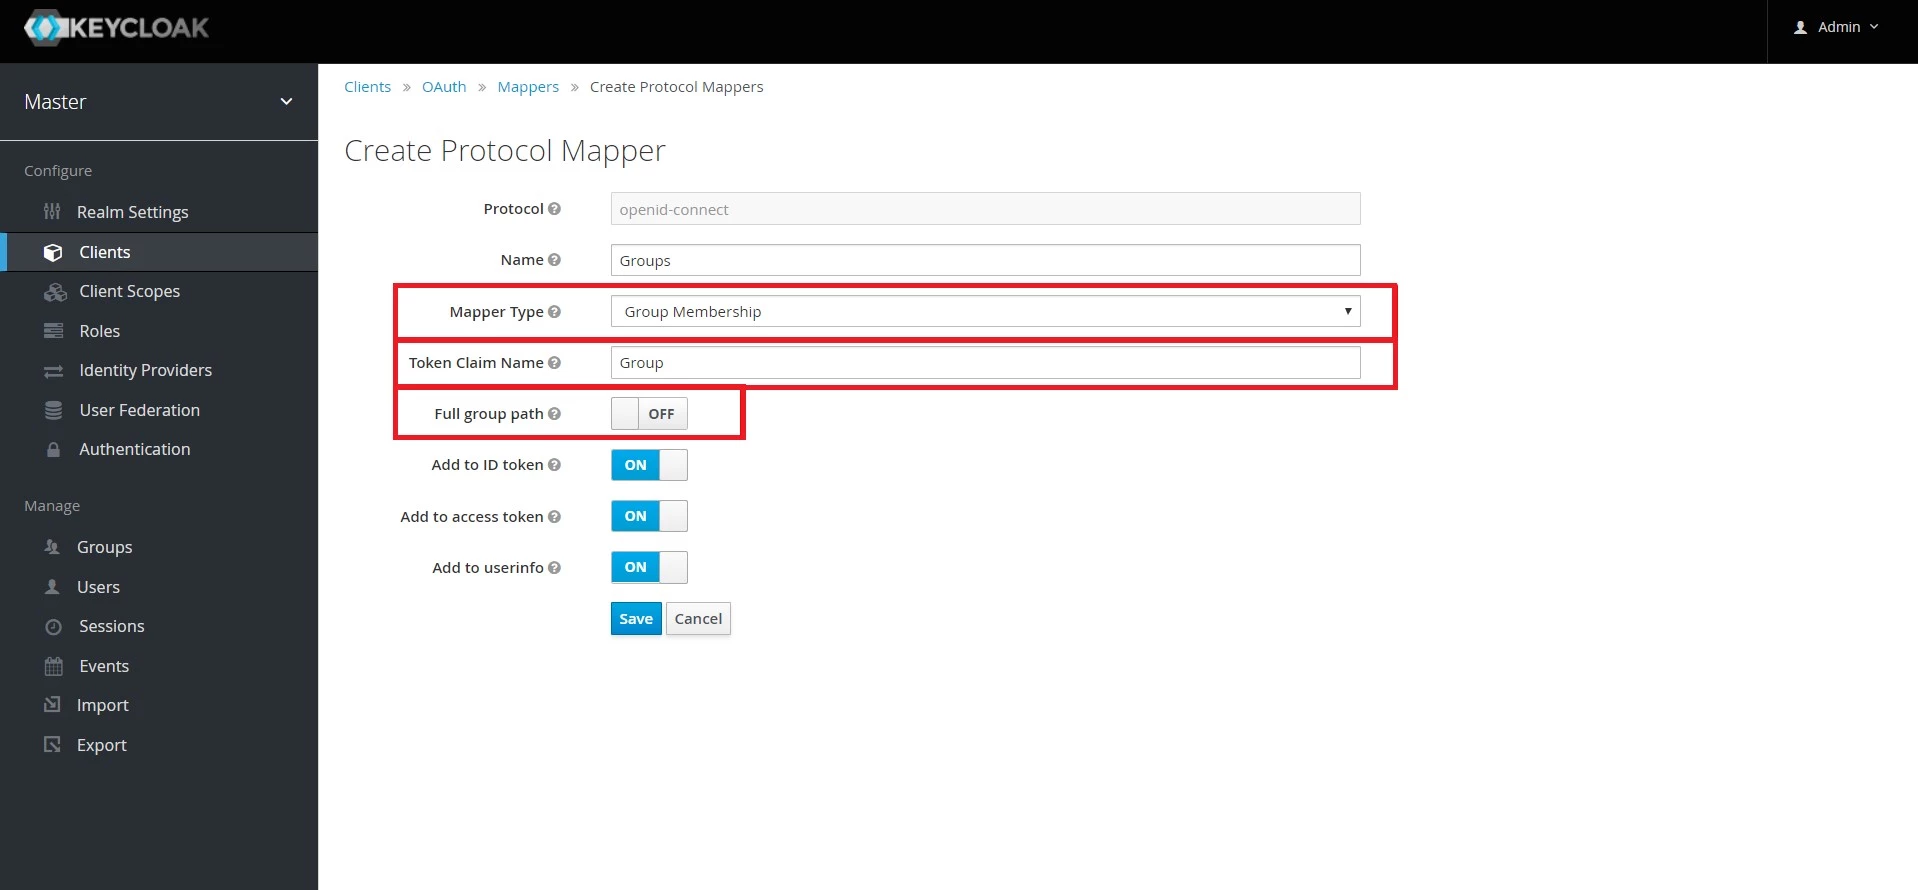
- For that, navigate to the Clients and select the client Id you created, then go to the Mappers tab and click on Create.
- Provide Name, select Mapper Type as Group Membership and enter the Token Claim Name i.e attribute name corresponding to which the groups will be sent.
- Turn off Full group path else group mapping will fail. And then click on Save.
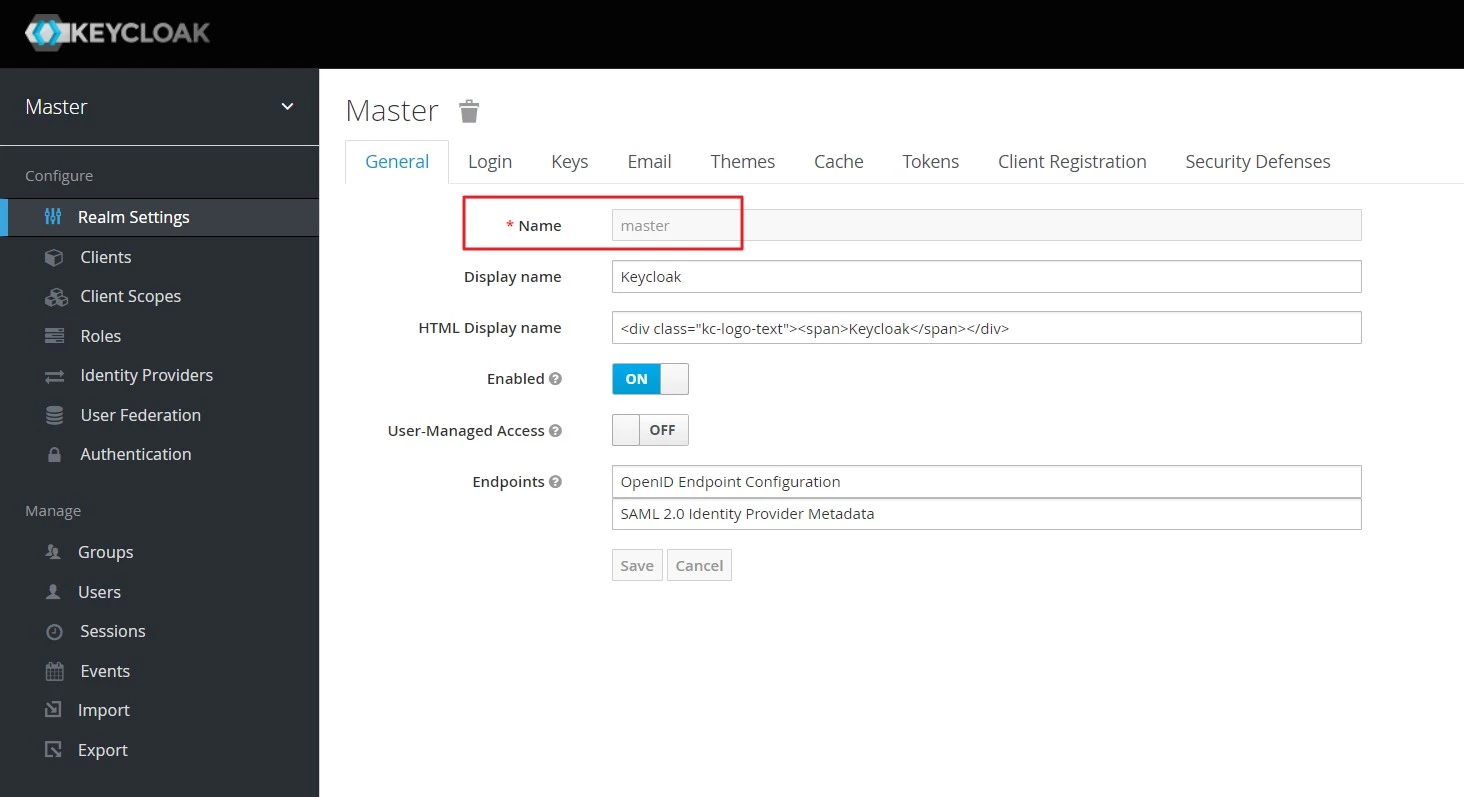
- Realm name: You need a realm name when you set up Keycloak as an OAuth provider, kindly copy it. For example in this case it is Master
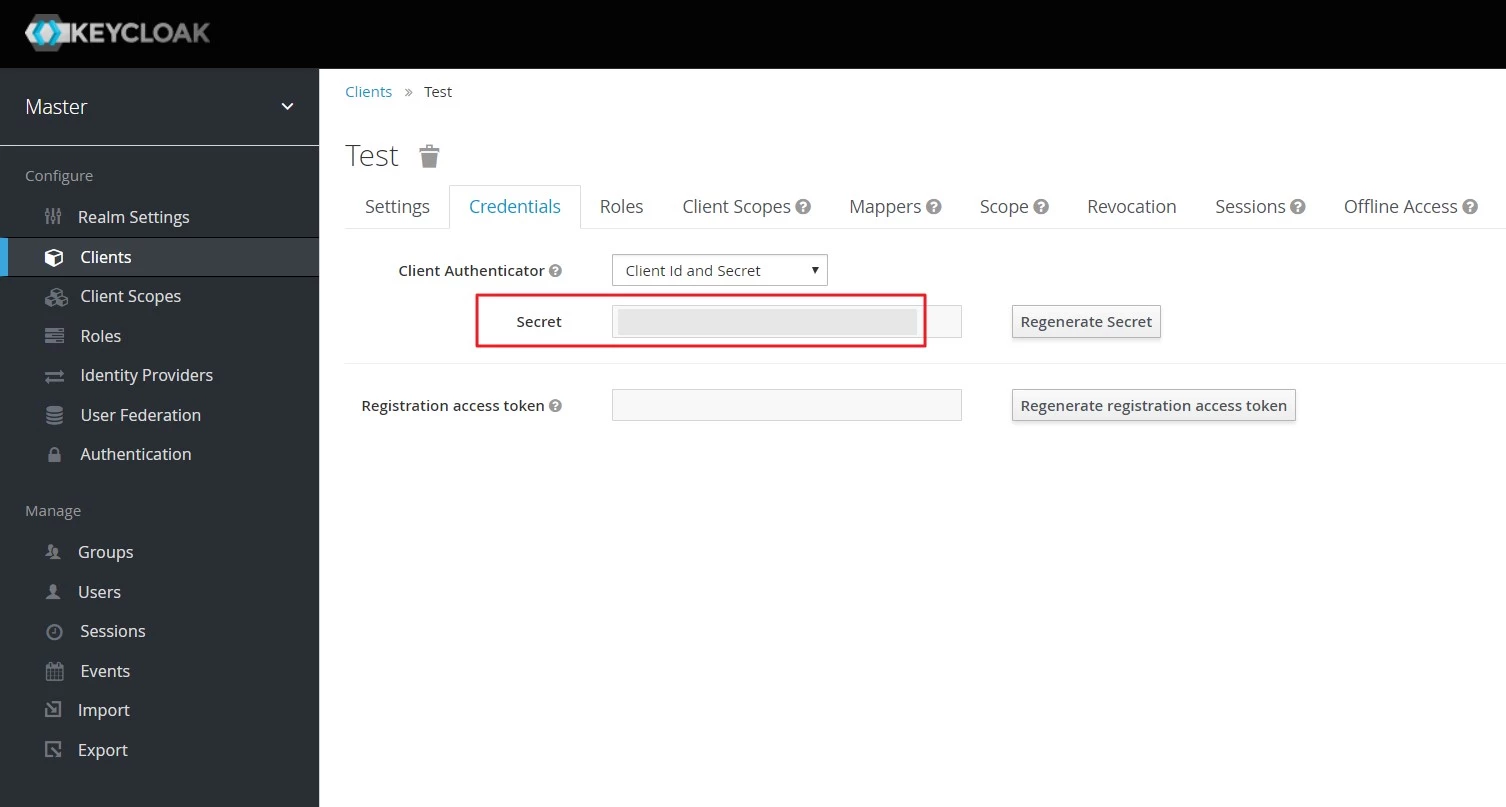
- Get Client Secret: To get Client Secret Navigate to Clients, select Client Id and navigate to the Credentials tab.
Step 2. Configure Keycloak in miniOrange.
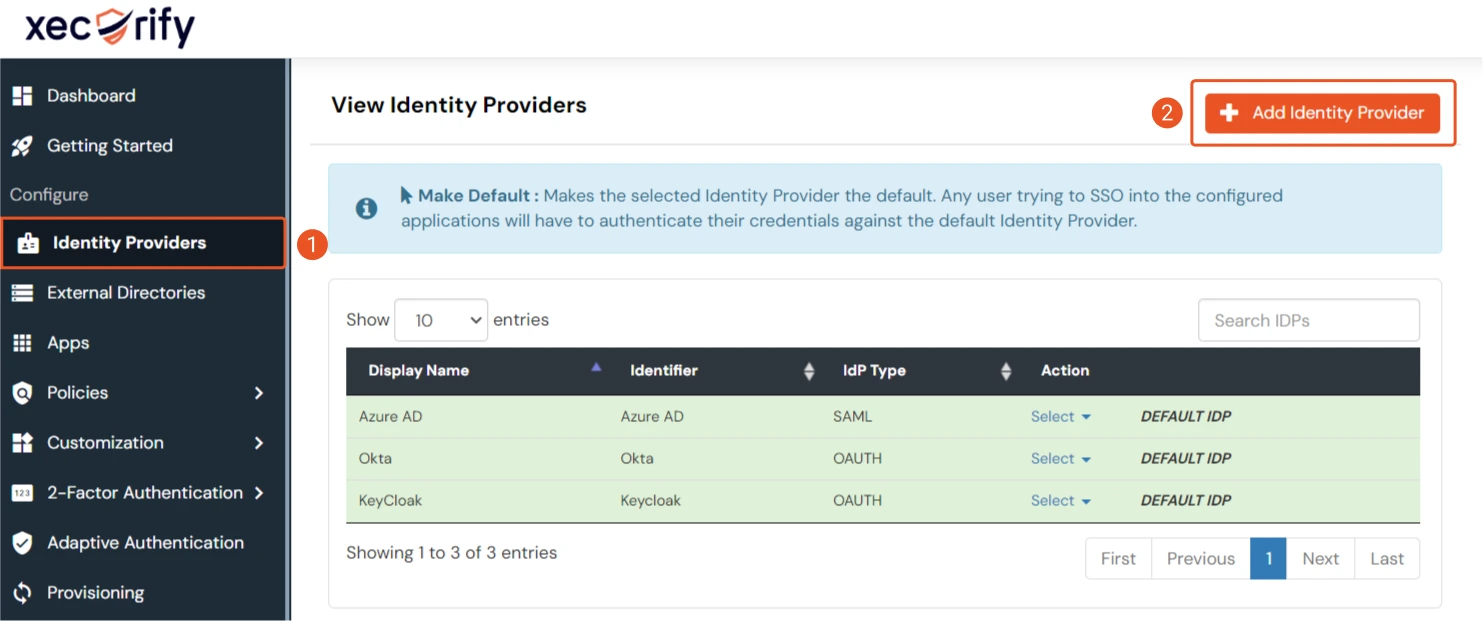
- Go to miniOrange Admin Console.
- From the left navigation bar select Identity Provider.
- Select OAuth
- Enter the following values.
- Now you can click on Save.
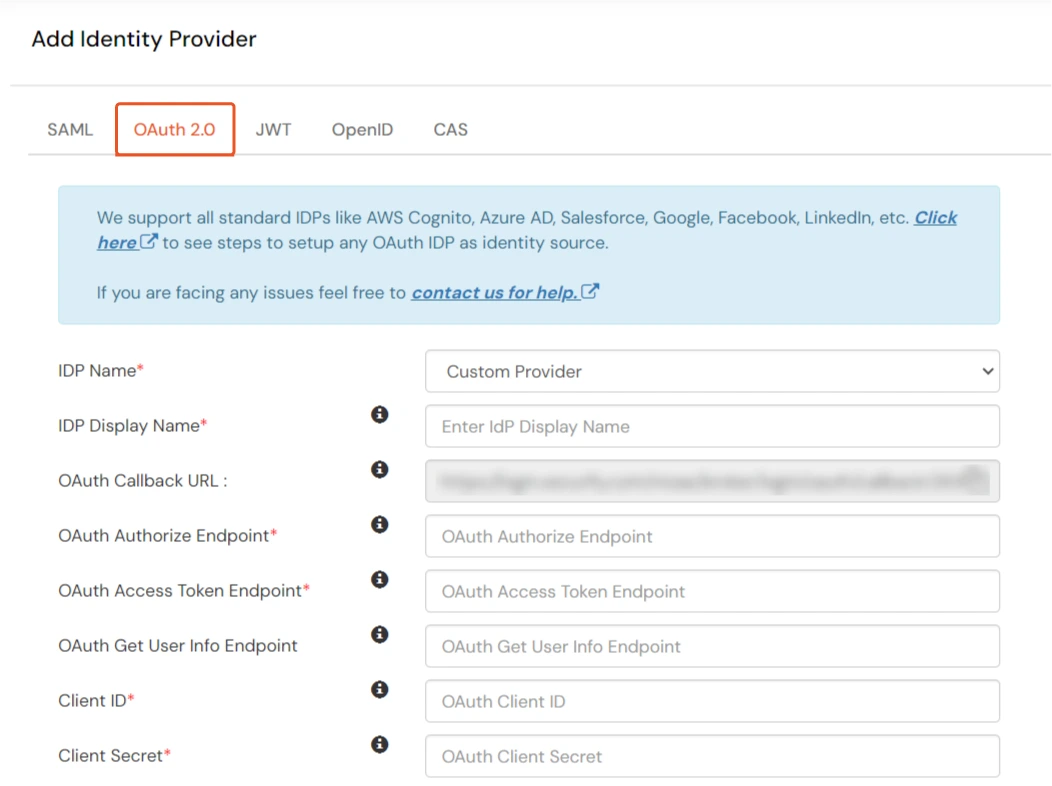
| IdP Name | Custom Provider |
| IdP Display Name | Choose appropriate Name |
| OAuth Authorize Endpoint | https://{keycloak-app-domain}/oauth2/authorize | OAuth Access Token Endpoint | https://{keycloak-app-domain}/oauth2/token | OAuth Get User Info Endpoint (optional) | https://{keycloak-app-domain}/oauth2/userInfo |
| Client ID | This value can be obtained from the above steps |
| Client secret | This value can be obtained from the above steps |
| Scope | openid |
Step 3. Test connection between miniOrange and Keycloak
- Go to the miniOrange Admin Dashboard.
- Go to Identity Providers tab. Then click on select button under the app you just created. Then click on Test Connection.
- A new popup login window will open. Enter your credentials and login.
- Now you will see TEST SUCCESSFUL in a new popup window. If not, then check if you have missed any of the above step.

Part 3: Test Atlassian - Keycloak Configuration
- Go to Atlassian Login Portal.
- Enter email and click on Continue. Then you will be redirected to Keycloak Login Page.
- After logging into Keycloak Login Page, you will be successfully logged into Atlassian Cloud Dashboard.

Exclusive features other miniOrange cloud app provides
- Multiple Identity Providers(IDPs) to authenticate different types of users with different IDP.
- Multiple Department Based Login to force the users to authenticate via a specific IDP based on the users' department.
- Domain Mapping that allow users to redirect to their IDP based on their email departments.
- Custom Attribute Mapping to update the user profile attributes in the application with the user attributes received from the IdP.
- Signed Request and Response to secure your SSO with signed requests and encrypted SAML assertions.
- Username Transformation to extract the required username from the received attribute using Regular Expression.
- Group Mapping allows mapping user’s Identity Provider(IdP) groups to application groups. The user groups are updated on SSO.
- User Store to integrate your application with multiple user stores like AD, LDAP, external database, etc. to easily manage your users.
- Server to Cloud Migration to easily migrate your server SSO settings into Cloud.

