Contents
Two Factor Authentication (2FA) for JIRA
Two Factor Authentication (2FA) for the Jira app, gives the ability to enable 2FA for Jira Software and Jira Service-Desk. Jira Software and Jira Service-Desk are compatible with all Authenticator Apps. Here we will go through a guide to configure 2FA between Jira and Mobile Authenticator. By the end of this guide, Jira users should be able to log in and register to Jira Software with the second factor of Authentication.
You can refer the steps to configure Two Factor Authentication (2FA) method with the Jira from the video or documentation given below
Pre-requisites
- Jira should be installed and configured (supported version from Jira Server 7.0.0 and Jira Data Center 7.0.0)
- Admin credentials are set up in Jira.
- Valid Jira Server or Data center Licence.
To configure Two-Factor Authentication for Jira, you need the following items:
Download And Installation
- Log into your Jira instance as an admin.
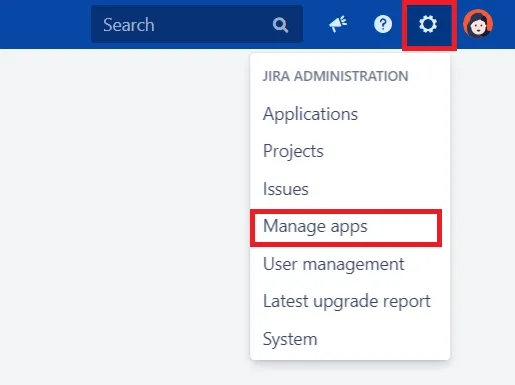
- Navigate to the settings menu and Click Manage Apps.
- Click Find new apps or Find new add-ons from the left-hand side of the page.
- Locate mO Two-factor Authentication(2FA) for JIRA, Jira 2FA via search.
- Click Try free to begin a new trial or Buy now to purchase a license for mO Two-factor Authentication(2FA) for JIRA
- Enter your information and click Generate license when redirected to MyAtlassian.
- Click Apply license.
1: Setup miniOrange 2-Factor Authentication
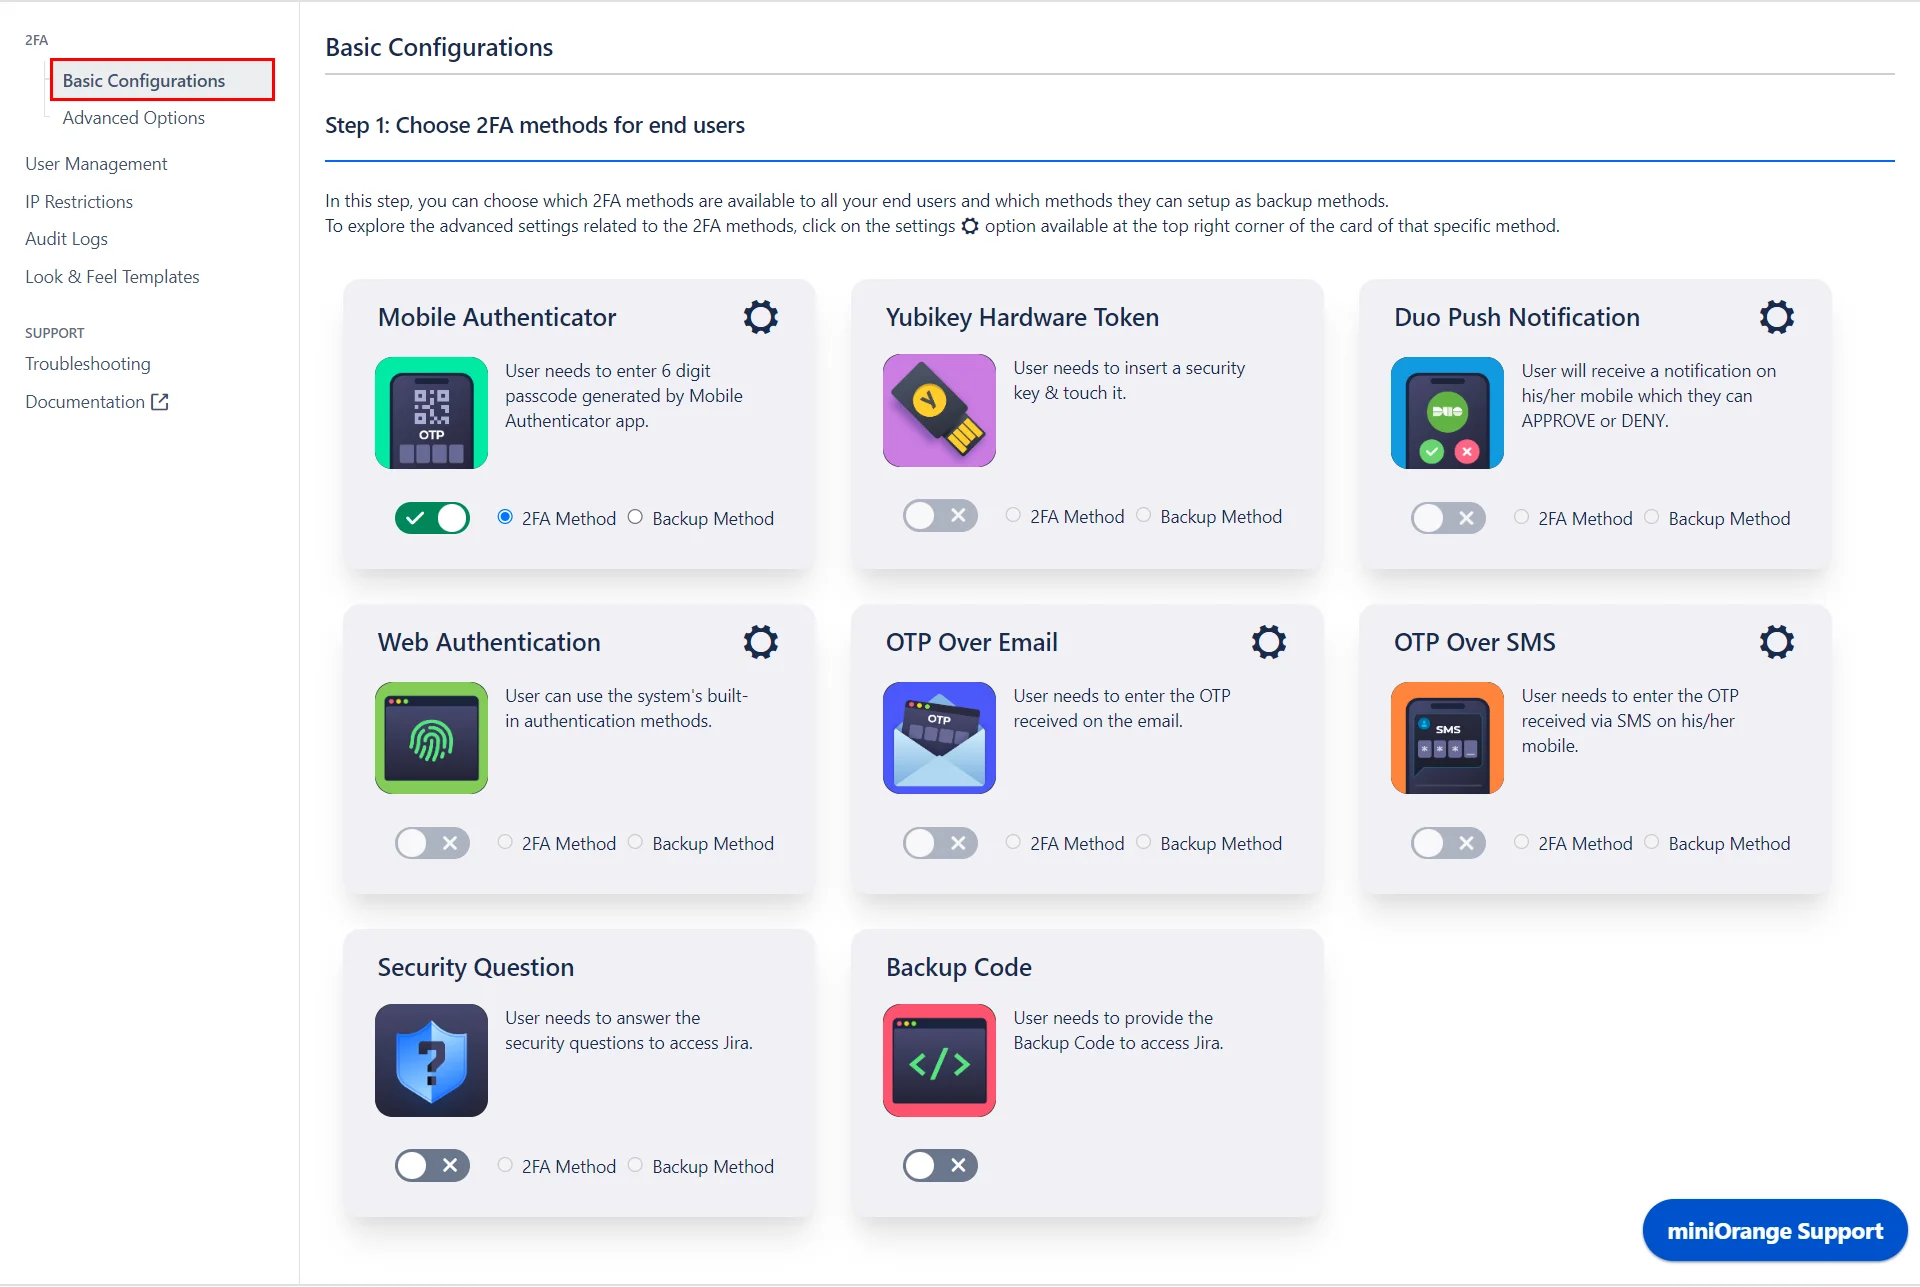
- The miniOrange 2FA addon offers a variety of 2FA methods. Choose the desired 2FA methods from the provided list and enable them for your users.
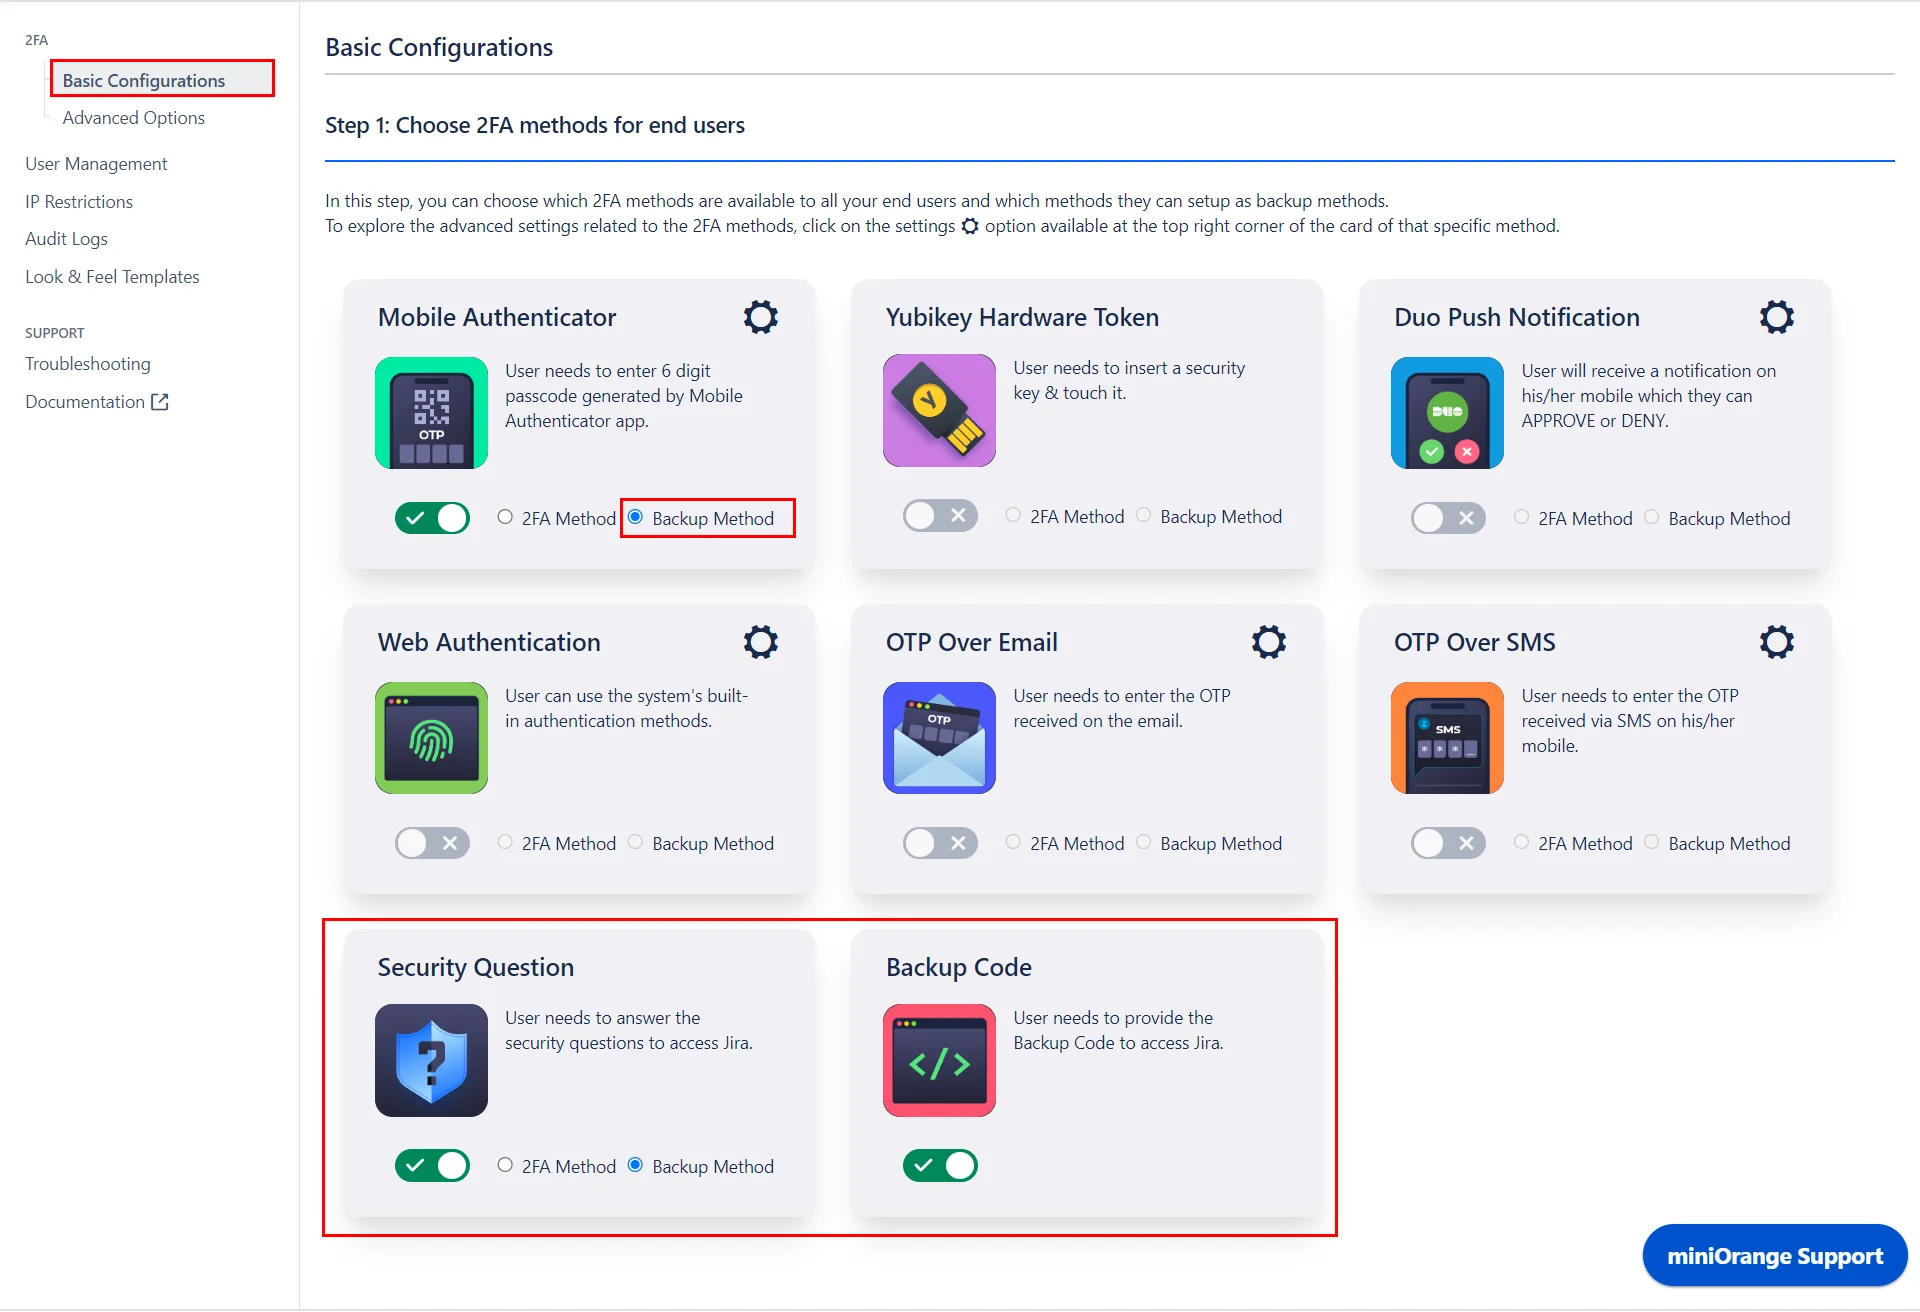
- Enable Backup Method: In case of emrgency login or when the user is not able to access their primary 2FA method, they can login using the Backup method. You may enable any 2FA method as your backup method.
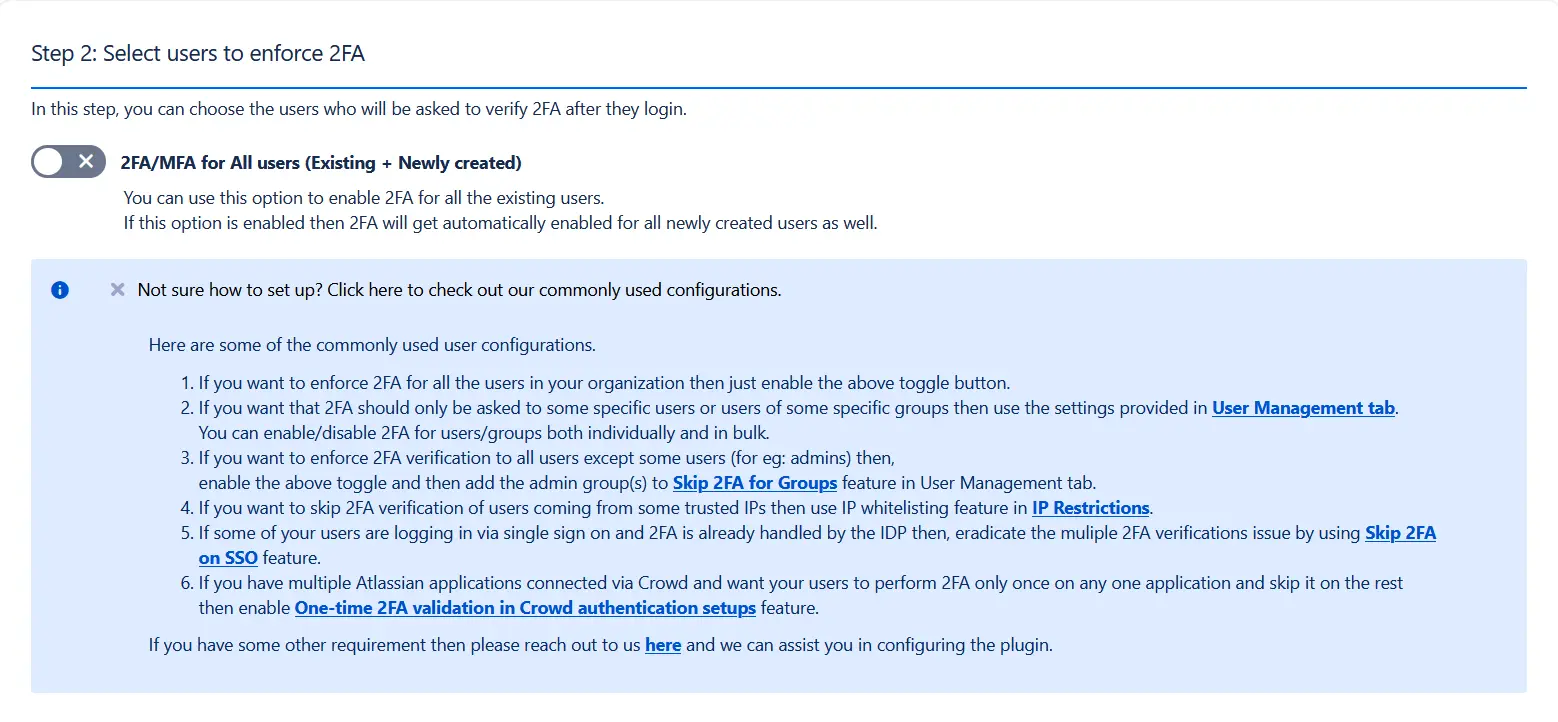
- Select users to enforce 2FA: Once the required 2FA methods are enabled, select the users on whom the 2FA is to be enforced.
Enable 2FA/MFA for All users option to enable 2FA for all the existing users. This will also automatically enable 2FA for all newly created users as well.

To enable 2FA for users as per your use case, you can check the commonly used configuartions. Based on your requirements, you may enable/disable/skip 2FA for users/group individually/in bulk/based on their IP etc.
- Enable 2-Factor Authentication: Lastly, enable 2FA for Jira Software or Jira Service Management as required.

2: How the user can Configure the 2FA
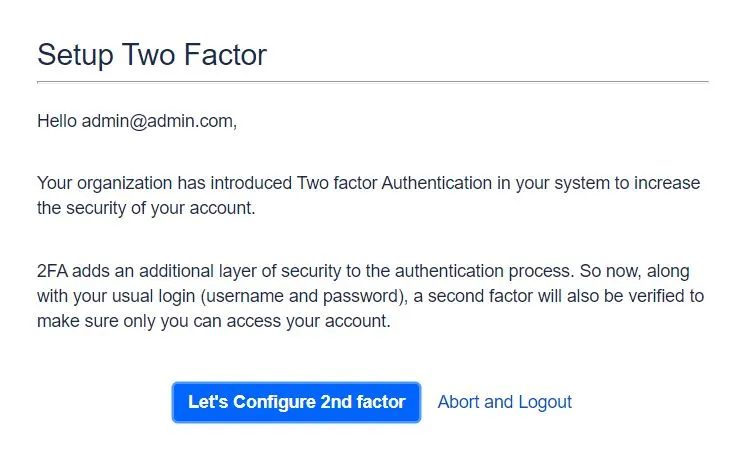
- Welcome Message for users: The following screen will be shown to users after enabling 2FA for a particular user & to configure Two Factor authentication methods.
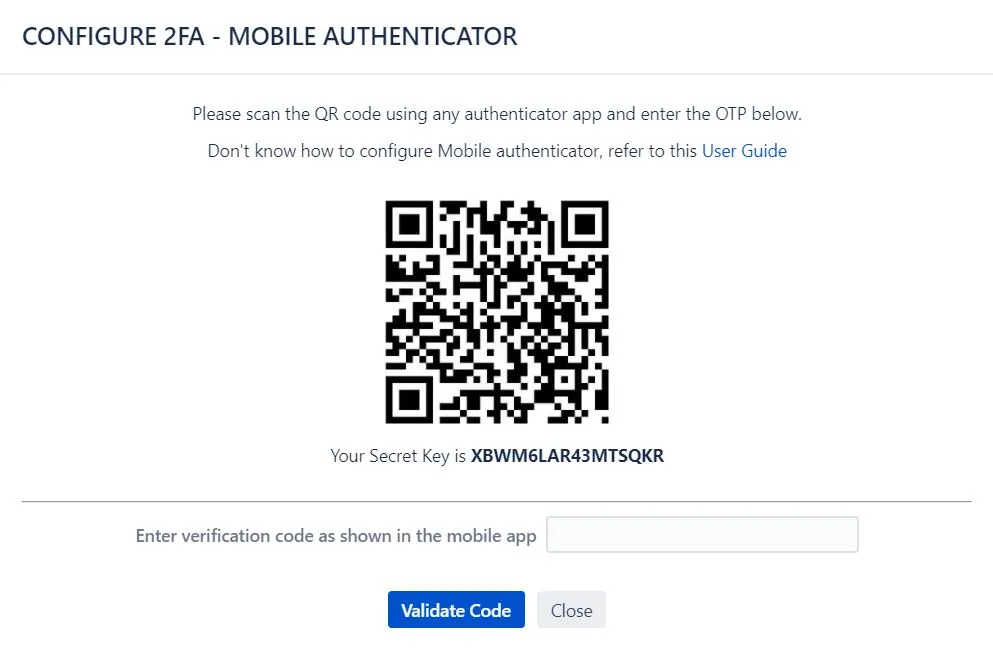
- Configure the Mobile Authenticator app: The below screen will be shown at the time of configuring Mobile Authenticator as a 2FA method. On this page the user needs to scan the QR code or use the Secret Key and then enter the 6 digit OTP generated on mobile app.
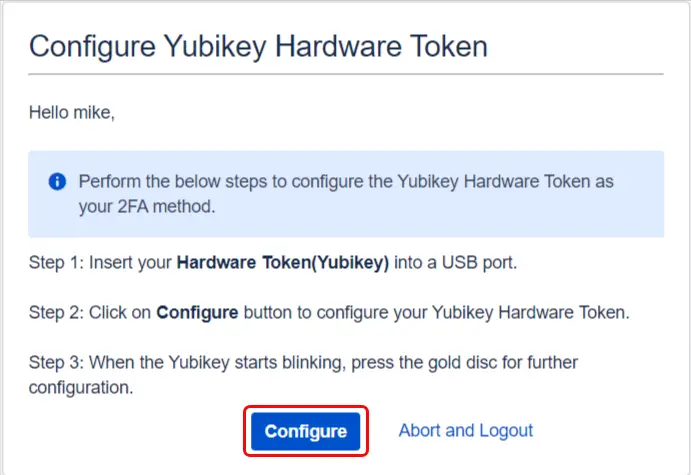
- Configure the Yubikey Hardware Token app: Prior to Yubikey Hardware Token configuration SSL needs to be set up on the Jira instance. The below screen will be shown at the time of configuring Yubikey Hardware Token as a 2FA method. On this page the user needs to follow the steps shown in page.
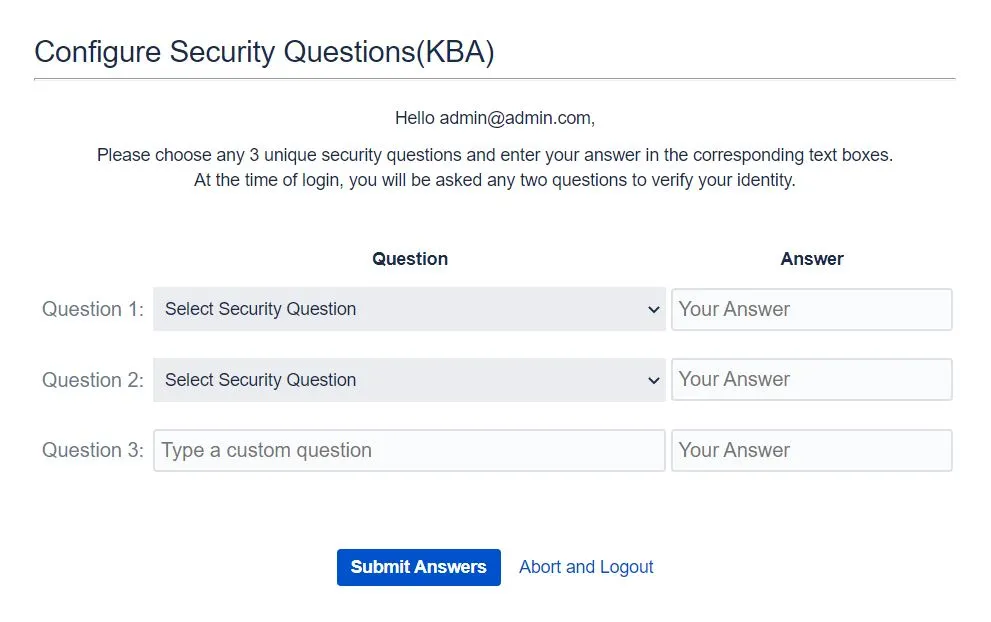
- Configure the Security Question: The below screen will be shown at the time of configuring Security Question as a 2FA method where the user needs to configure the Security Questions based on his knowledge.
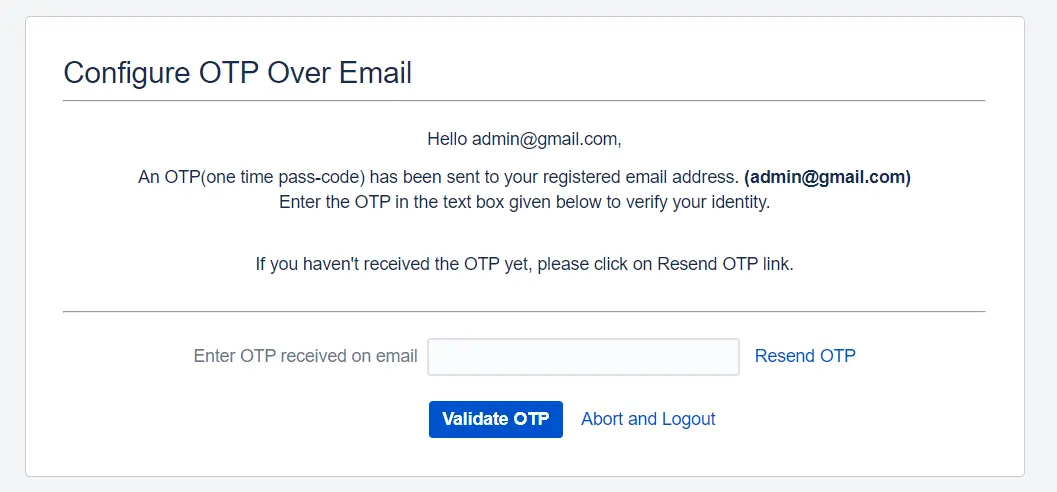
- Configure the OTP Over Email: The below screen will be shown at the time of configuring OTP Over Email as a 2FA method where the user needs to provide the OTP which is sent on his email address.
- Configure the OTP Over SMS: In this method, users need to verify their identity by entering the OTP they receive via SMS on their registered mobile number.
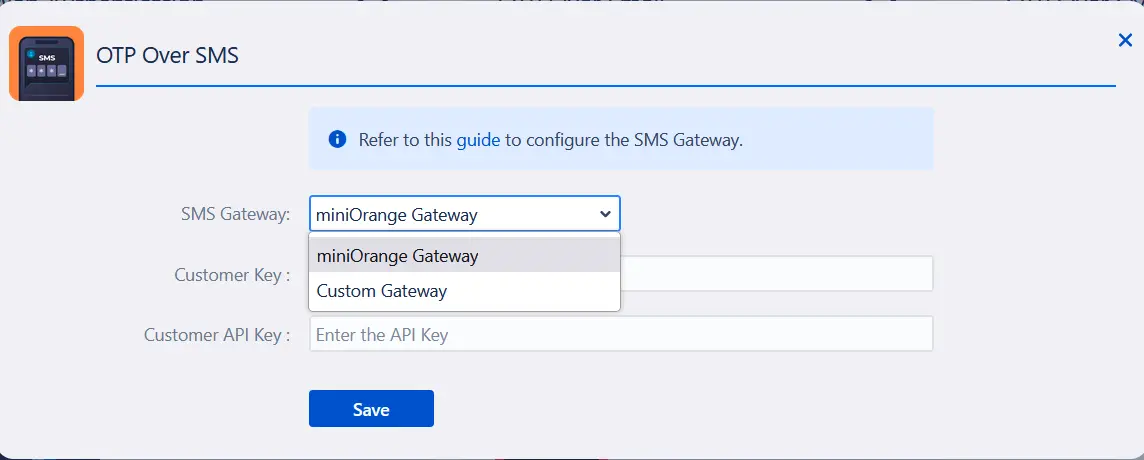
In order to use OTP over SMS as a 2FA method, an SMS gateway needs to be configured. You can either go with the miniOrange SMS Gateway or use your own Custom Gateway for sending OTPs. Refer to this document to configure the gateway.
The below screen will be displayed to the end-user while configuring OTP Over SMS, where the user first needs to enter their mobile number and then validate the OTP which is sent to his/her mobile number. - Configure Duo Push Notification : In this method, the user needs to APPROVE the authentication request received on their registered device to verify their identity.
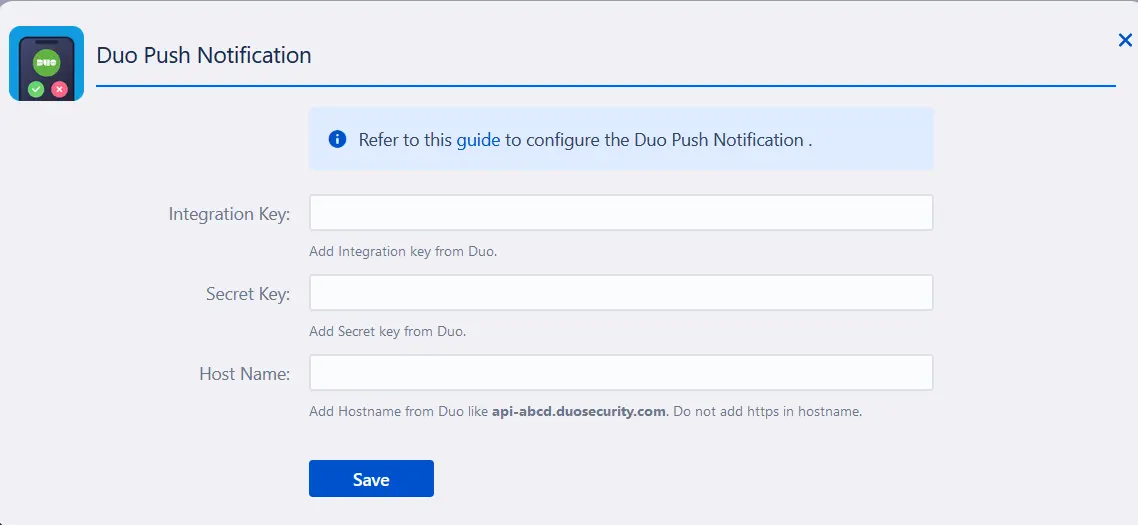
In order to enable Duo Push Notification as a 2FA method for all users, the Jira admin needs to integrate Jira with Duo. For integration, the admin needs to create an application in Duo and copy the Integration key, Secret key and API hostname from Duo and paste it accordingly under the Duo Push Notification Settings in the Advanced Settings section of the 2FA addon in Jira.
The below screen will be displayed to the end-user while configuring Duo Push Notification, where the user first needs to register the device on which they wish to receive Push Notification and then APPROVE the authentication request received on their device

- Configure Web Authentication as a 2FA method: Configuring Web Authentication as a 2FA method allows users to use their system's built-in authenticators like Windows Hello PIN, Apple’s Touch ID, FaceId or any other biometric authenticators as a Second factor to login into their Atlassian account.
Your Atlassian instance should be configured with Secure Context(HTTPS) if you wish to use Web Authentication.
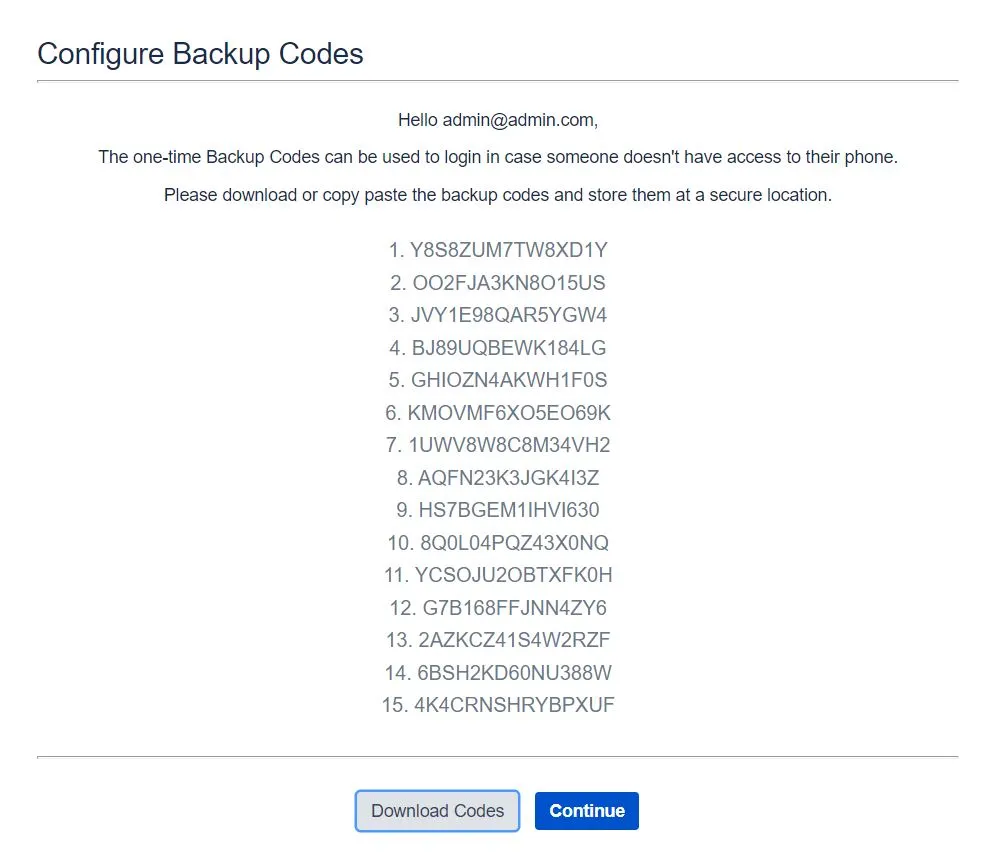
The below screen will be shown to the end-user while configuring Web Authentication as a 2FA method. Users need to register their system authenticators like Windows Hello PIN, Apple’s touch Id or other biometric authenticators supported with their Atlassian instance in order to use them for validation during 2FA. - Configure the Backup Code as Backup Method: Incase of emergency login, if the Backup Code is activated as a Backup Method, the user will see the screen below where the user will see the list of one-time passcode.


3: Additional Features
3.1: Brute Force Configuration
- It is used for restricting the access to your Jira Application based on the number of Invalid 2FA Login Attempts for the specified period of time. For enabling Brute Force Configuration, click on the 'Enable Brute Force Protection for Jira' checkbox, then select the number of invalid login attempts after which user will lock, and the time for which the user will be in a locked state and won't get access to Jira application

- It allows the user to ignore the 2FA check when trying to log in from the same device. Enable the checkbox for 'Remember My Device' feature, and in 'Expiry Time (in Days)' section enter the number of days for which the remember my device settings will be saved.
3.2: Remember My Device

- It allows users to skip 2FA in Crowd connected applications after successfully validating in any one application.(This feature should be enabled in any application in which you want to skip/bypass 2FA and for the first application users needs to validate 2FA after which 2FA will be skipped in other applications)
3.3: One-time 2FA validation in crowd application

3.4: Mobile Authenticator Settings
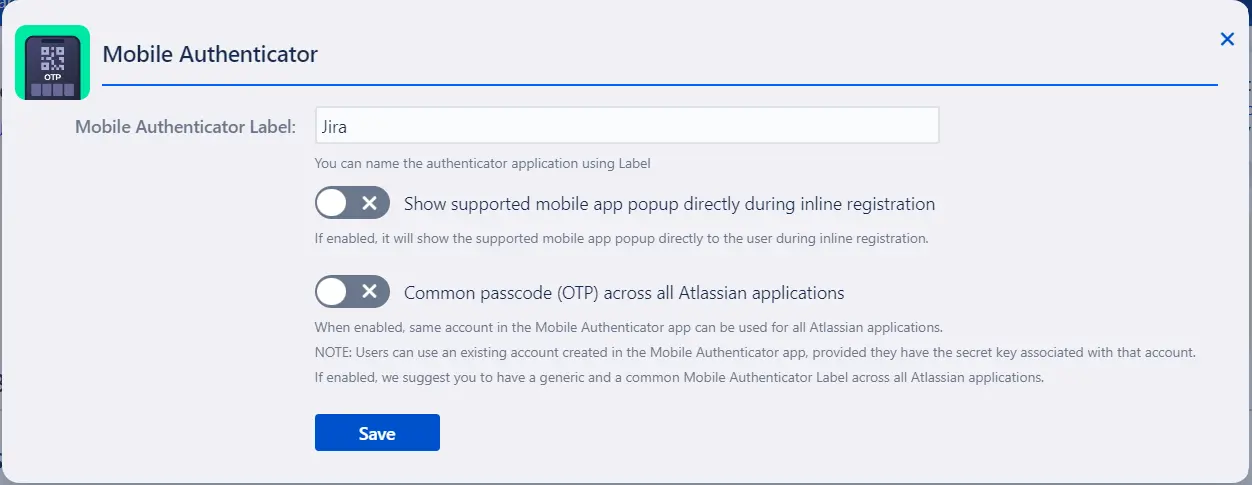
- Common passcode across all Atlassian applications : It allows users to use the same passcode(OTP) for all the Atlassian applications. For this users need to use the secret key of an existing account created in Mobile Authenticator application at the time of registration for the first time. Users can get the secret key from the Two Factor Configuration tab under the User Profile icon of the application where they have already registered with this 2FA method.
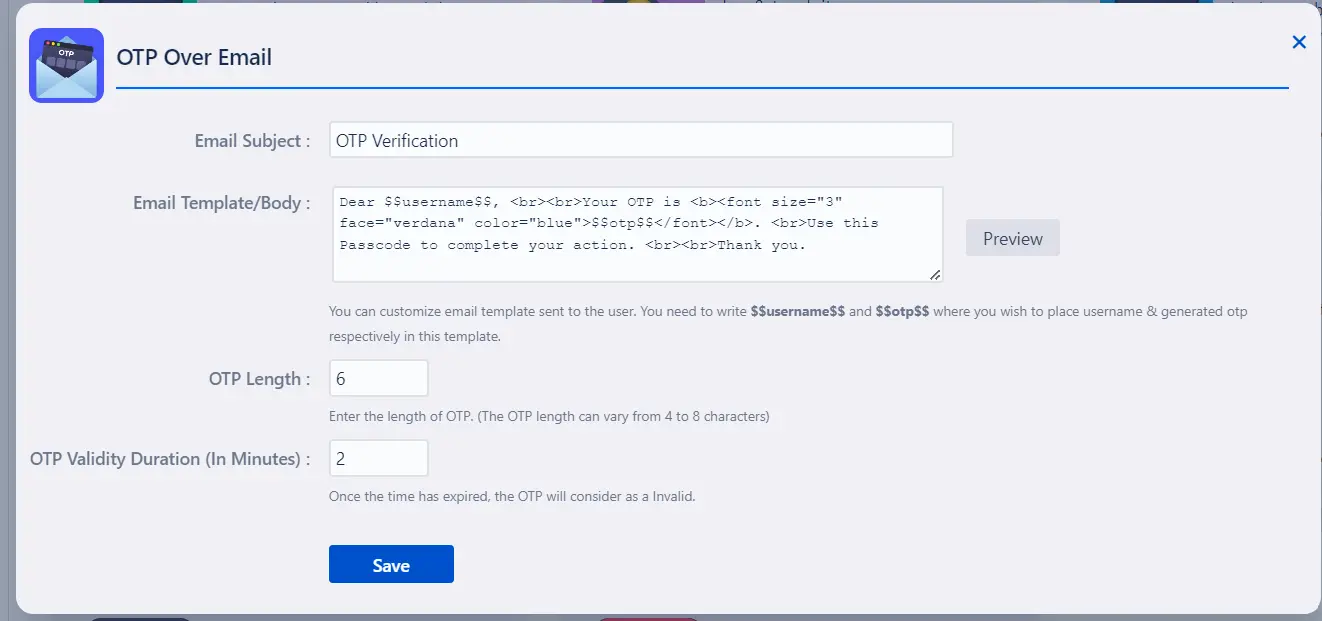
- Admin can customize his own Email template at the time of Sending OTP. Here he can also customize OTP length as well as OTP Expiry duration.
3.5: OTP Over Email Settings
- To enable Duo Push Notification as a 2FA method for all users, the Jira admin needs to integrate Jira with Duo. For integration, the admin needs to create an application in Duo and copy the Integration key, Secret key and API hostname from Duo and paste it accordingly under the Duo Push Notification Settings.
3.6: Duo Push Notification Settings
- The admin needs to configure an SMS gateway to have OTP over SMS 2FA method functional. You can either go with the miniOrange SMS Gateway or use your own Custom Gateway for sending OTPs. Configure the gateway using the guide linked here.
3.7: OTP over SMS Settings
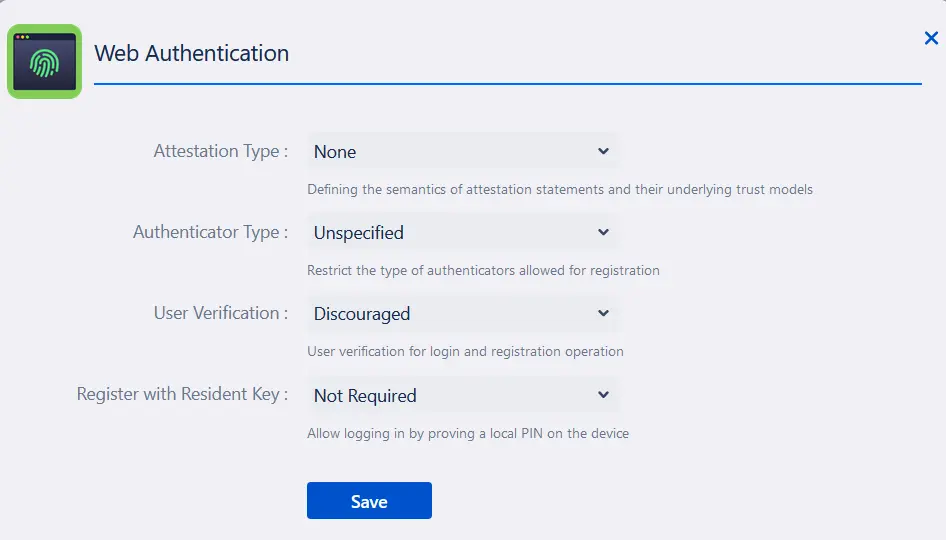
- The admin can customise the attestation type, authenticator type, user verification for login and whether to enable registering with the resident key for the system authenticators.
3.8: Web Authentication Settings
- The admin can customise the Security questions list as follows.
3.9: Security Question Settings

- It allows users to skip 2FA if they login via SSO. Admin has to add Single Sign on URL in case of SAML and Callback URL in case of OAuth/OpenID from the SSO Provider.
3.10: Skip 2FA for Jira SSO Users

- It allows users to skip 2FA if they login via SSO using minOrange Crowd SAML addon and Jira Crowd connector. Admin has to add Secret Key provided by the miniOrange crowd addon and Crowd SSO cookie name
3.11: Skip 2FA for Crowd SSO Users

4: User Management
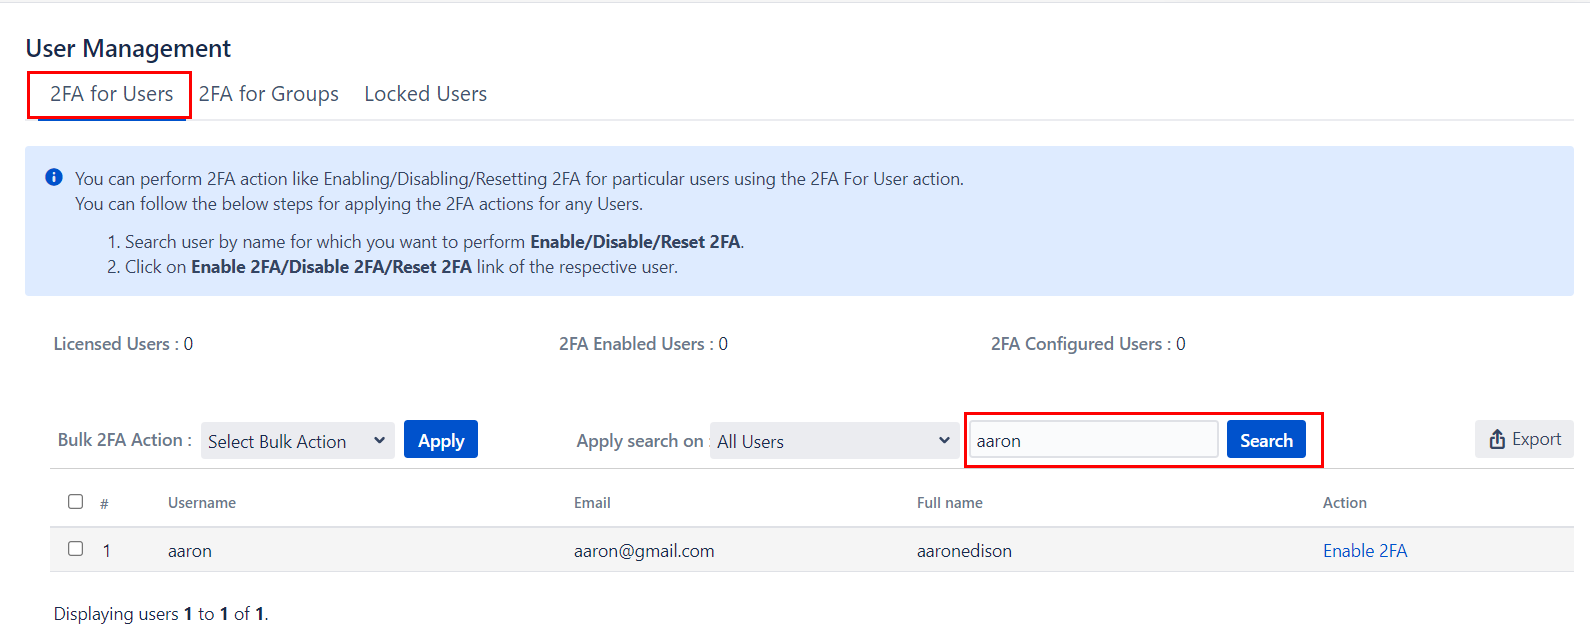
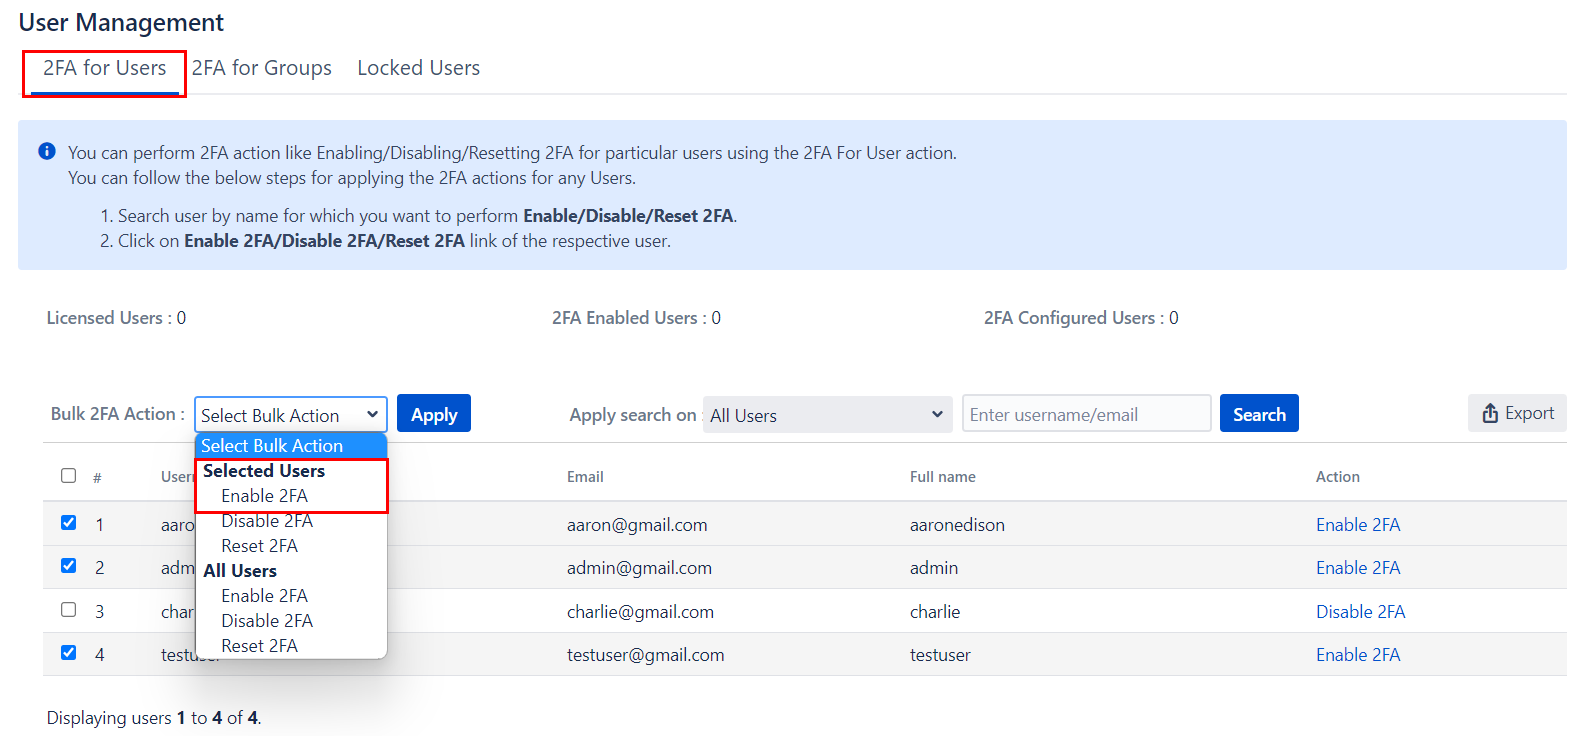
- 2FA for Single User: Enter the name of the user in the Search Bar for whom you want to perform the operation and hit the search button, the user with that name will appear. And then in the Action column, select the required Action.
- 2FA for Multiple Users: Select the users, in the Bulk 2FA Action drop-down list select the action you want to perform. And then hit Apply Button.
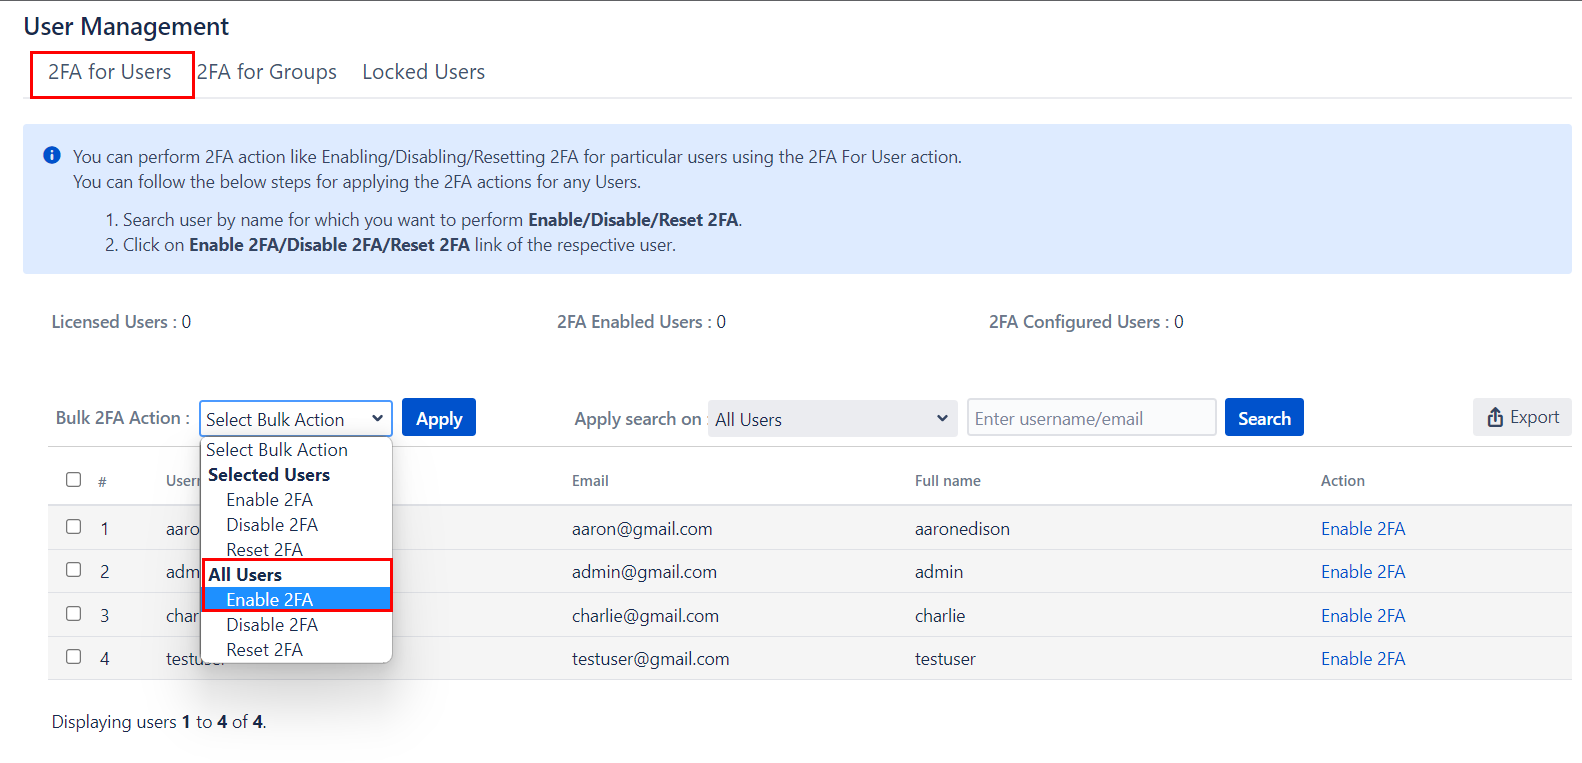
- 2FA for All Users: In Bulk 2FA Action Dropdown list under All users Section select necessary Action and hit Apply Button.
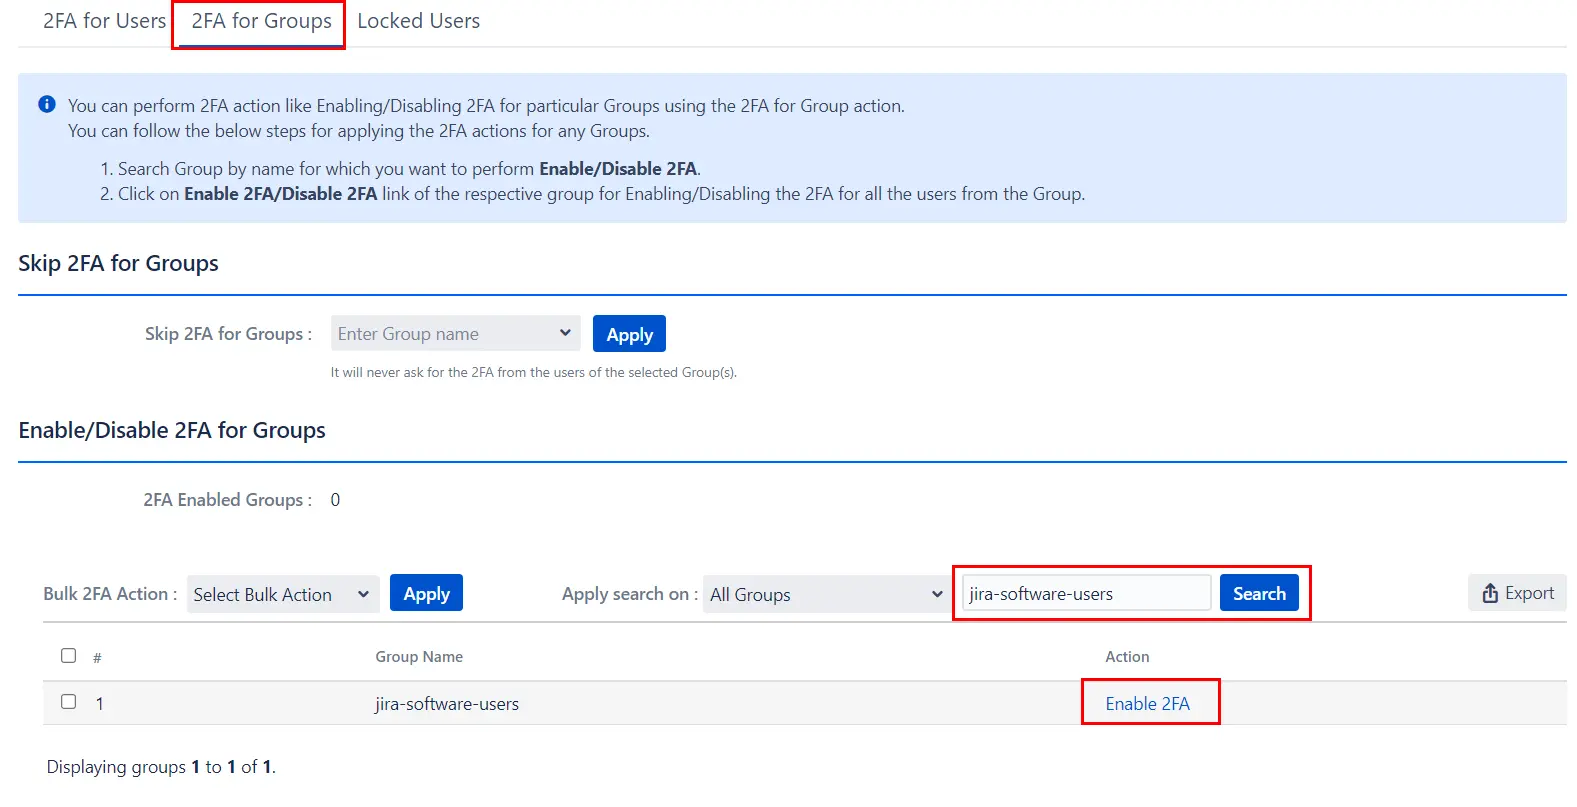
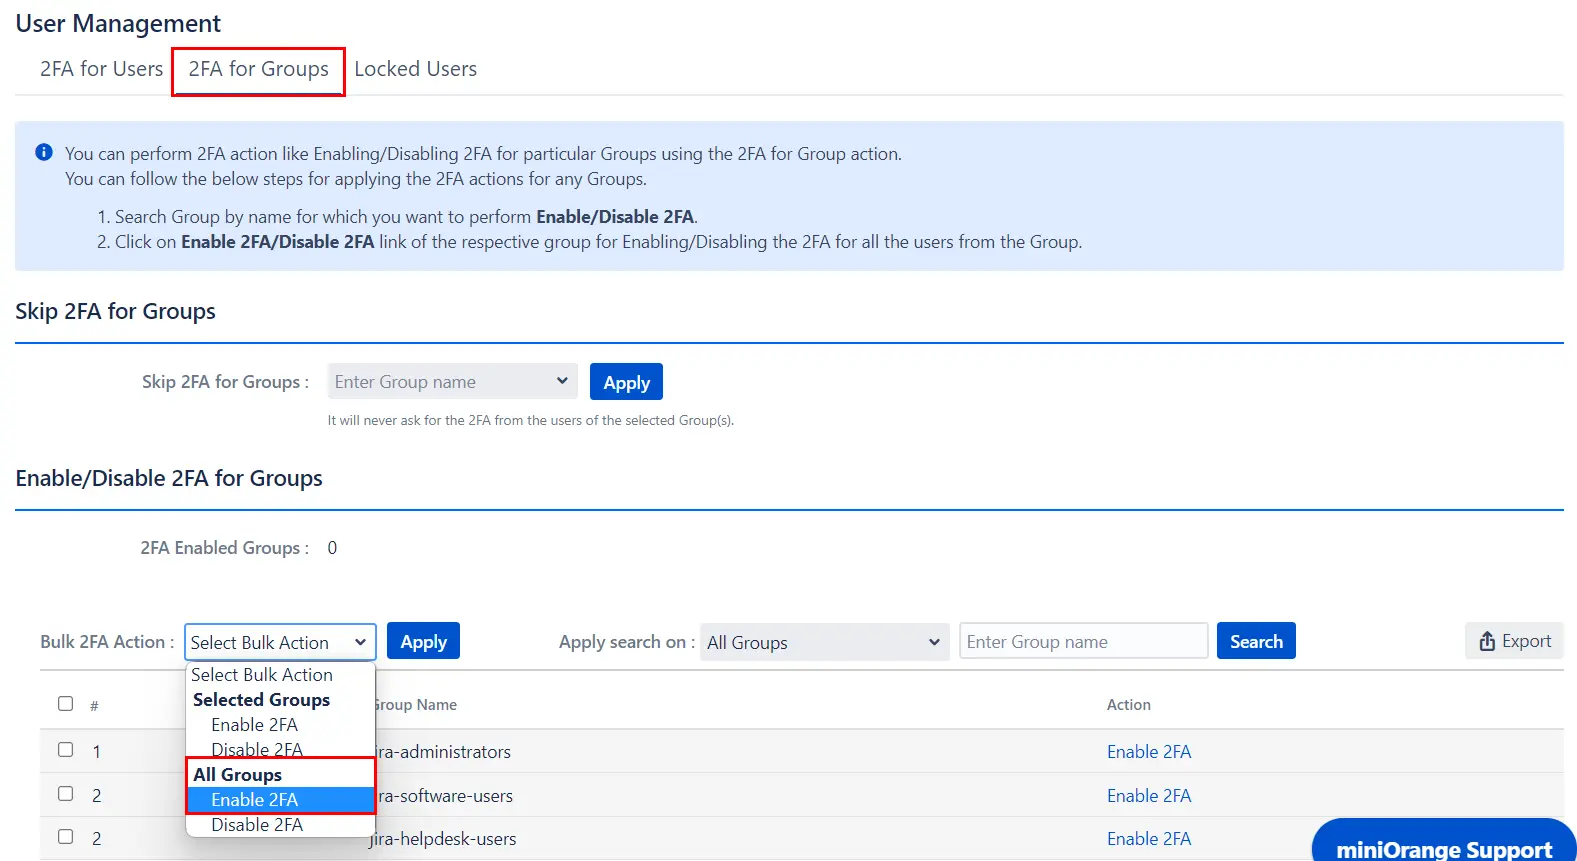
- 2FA for Single Group: Enter the name of the group in the Search Bar for which you want to perform the operation and hit the search button, the group with that name will appear. And then in the Action column, select the required Action.
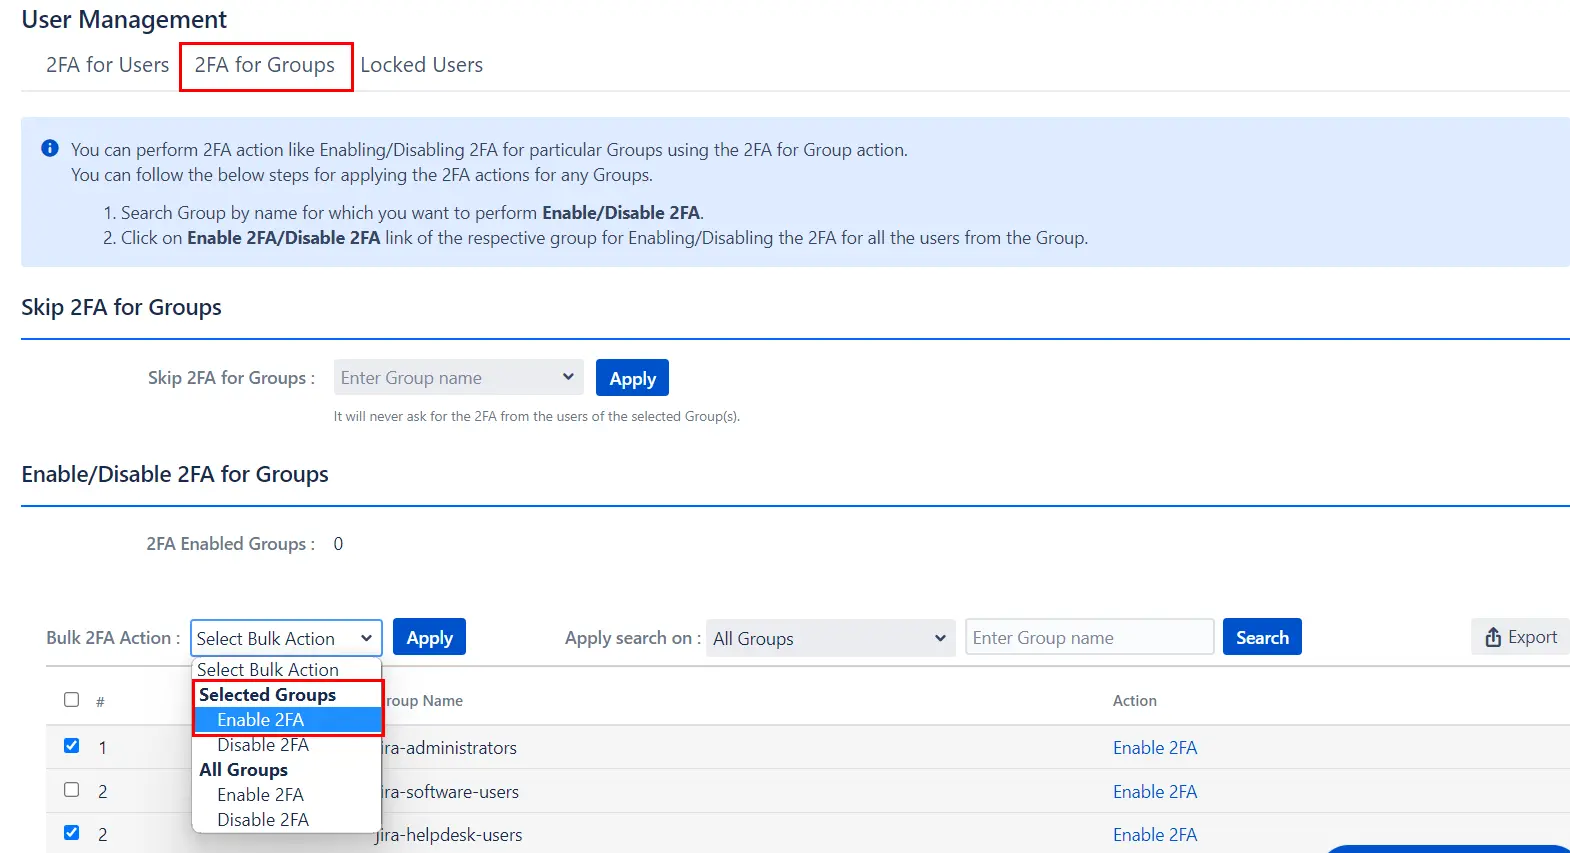
- 2FA for Multiple Groups: Select the Groups, in the Bulk 2FA Action drop-down list select the action you want to perform. And then hit Apply Button.
- 2FA for All Groups: In Bulk 2FA Action Dropdown list under All groups Section select necessary Action and hit Apply Button.
5: IP Restrictions
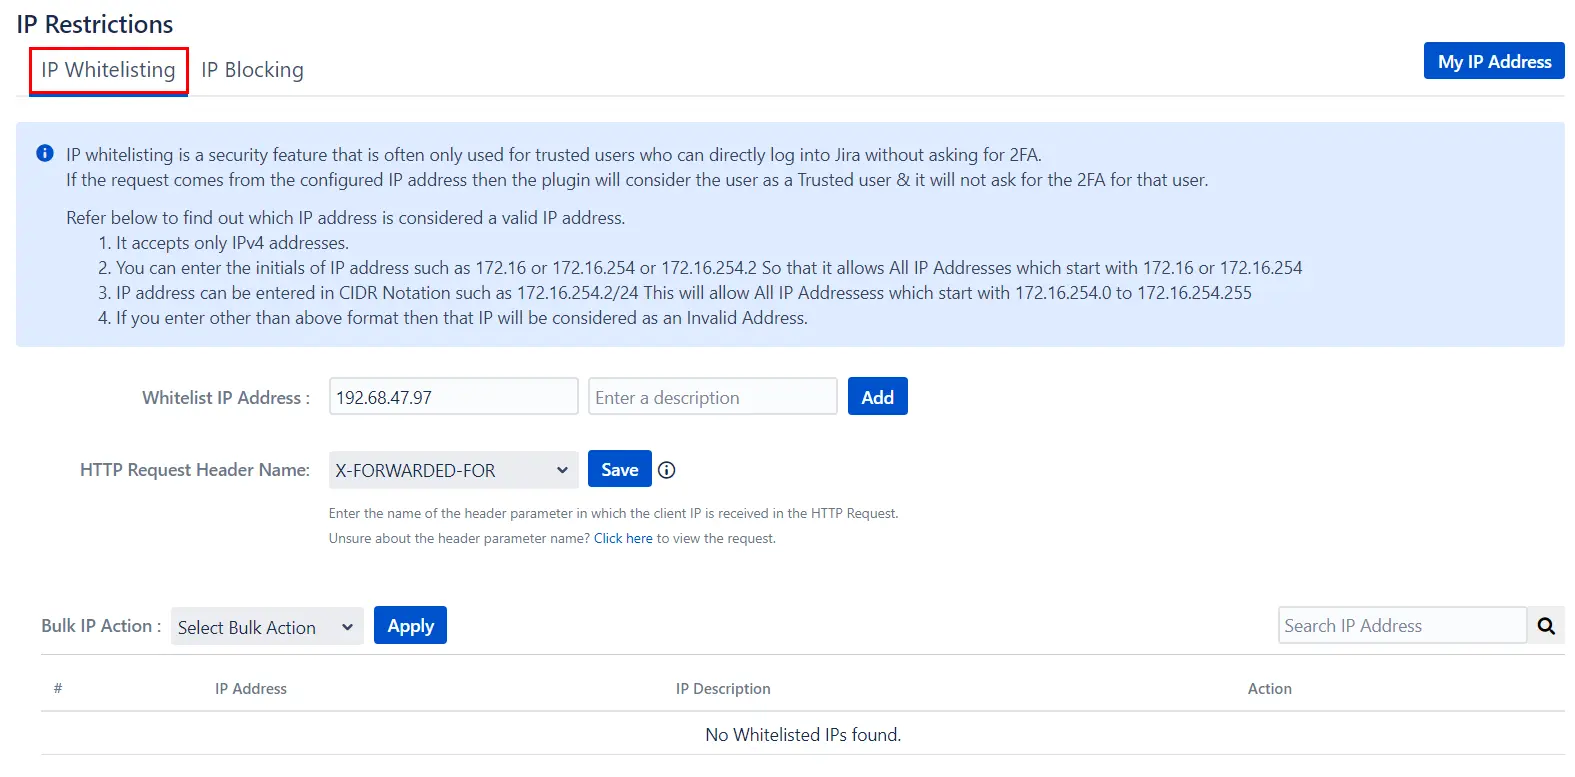
- IP Whitelisting: It is a security feature that is often used for trusted users who can directly log into Jira without asking for 2FA. Enter the IP address and click save for enabling the IP whitelisting
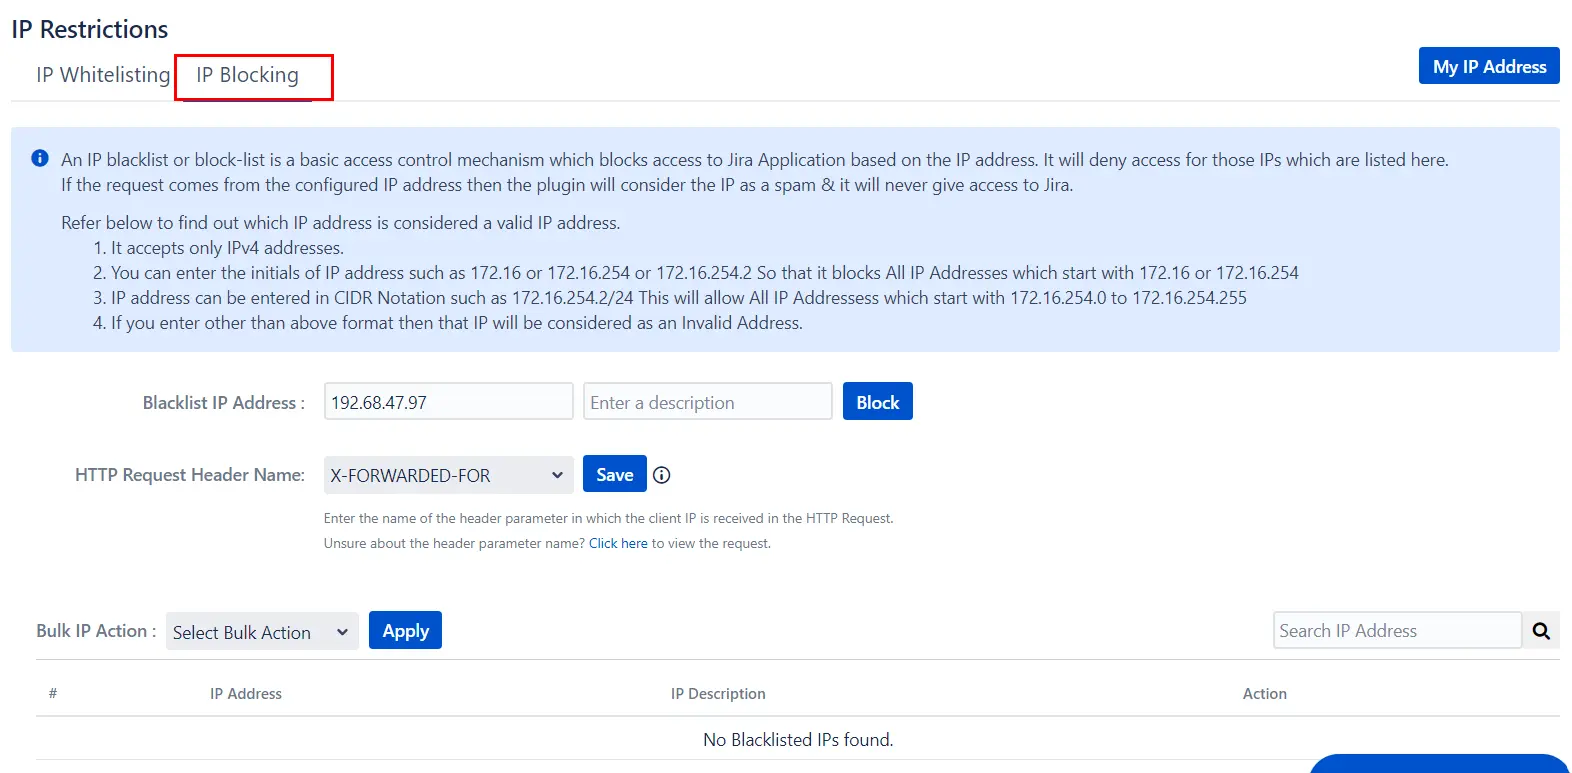
- IP Blocking: It is a basic access control mechanism that blocks access to Jira Application based on the IP address. It will deny access for those IPs which are listed here. Enter the IP address in the text box for IP blocking. The message for this blocked users can be customized, enter the message in the 'Blocked User Message' text box and click on save button.
6: Reconfigure 2FA
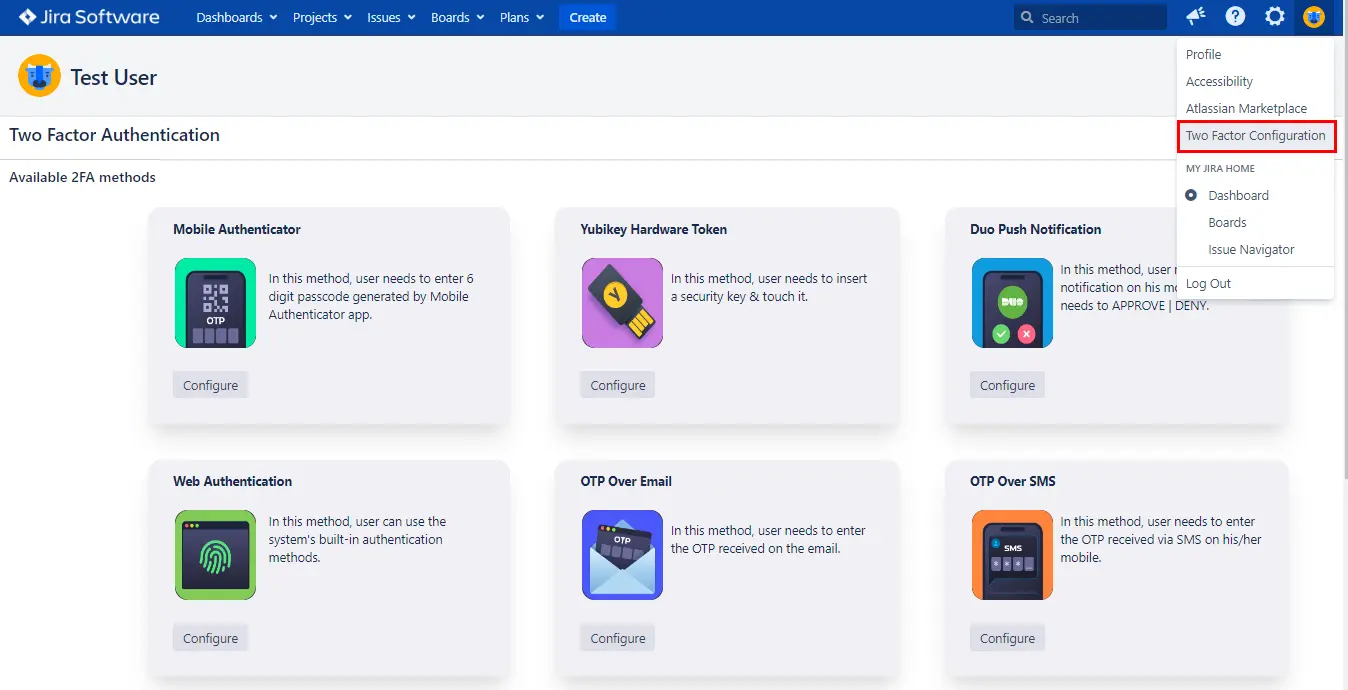
- Reconfigure 2FA: The end-users can reconfigure their 2FA on their own by navigating to User Profile click on Two-factor Authentication, you can see the Configure Two Factor(2FA) window, now click on Reset button to Reconfigure the users 2FA method. The user can also configure additional 2FA methods from here, if they are not previously configured.
Recommended Add-Ons

Jira SAML SSO
Jira SAML SSO application enables SSO for Jira Software and Jira Service Desk.
Know More
User Sync SCIM Provisioning
Synchronize users, groups and directory with SCIM and REST APIs for Server DC.
Know More
API Token Authentication
Secure your Jira Data Center/Server REST API using API Tokens.
Know MoreAdditional Resources
Bitbucket Git Authentication App | Kerberos/NTLM Apps | Word/PDF Exporter | WebAuthn | SonarQube SSO | Jenkins SSO
If you don't find what you are looking for, please contact us at support-atlassian@miniorange.atlassian.net or raise a support ticket here.

