Hello there!

Need Help? We are right here!

Support Icon
miniOrange Email Support
success

Thanks for your Enquiry. Our team will soon reach out to you.

If you don't hear from us within 24 hours, please feel free to send a follow-up email to info@xecurify.com

Search Results:

×

React Single Sign-On SSO


React JWT Single Sign-On (SSO) solution by miniOrange provides secure Single Sign-On access into React application using a single set of login credentials. This is done using JSON Web Token (JWT). You can enable social login for your users to get secure access to applications using any of their existing social providers such as Facebook, Twitter, Google, or LinkedIn.

With miniOrange React SSO, you get:

  • Seamless user login experience.
  • Endless customizations to your login forms and pages.
  • Simplified customer or user on-boarding.


Connect with External Source of Users


miniOrange provides user authentication from various external sources, which can be Directories (like ADFS, Microsoft Active Directory, OpenLDAP, AWS etc), Identity Providers (like Microsoft Entra ID, Okta, AWS), and many more. You can configure your existing directory/user store or add users in miniOrange.


Prerequisites

Please make sure your organisation branding is already set under Customization >> Login and Registration Branding in the left menu of the dashboard.

Follow the step-by-step guide given below for React Single Sign-On (SSO)

1. Configure React in miniOrange

  • Go to Apps and click on Add Application button.
  • React Single Sign-On (SSO) add app

  • In Choose Application, select JWT from the application type dropdown.
  • React SSO: Configure JWT app type

  • In the next step, search for React application from the list. If your application is not found, search for JWT App and you can set up your Application.
  • Configure JWT application: Search React JWT application

  • You can configure the following details in the application:
  • Custom App Name Enter the Application Name of your choice, and add a description if required.
    Redirect-URL Enter the Redirect-URL (i.e. the endpoint where you want to send/post your JWT). You can add multiple redirect URLs by separating them with a ‘;’. E.g. abc.com;xyz.com
    Primary Identity Provider (optional) Select your Identity Source from the dropdown. You can select miniOrange here as default IDP.
    React SSO: JWT app details

  • Click on Save to complete the configuration.
  • Click on Edit in the select menu against your app.
  • React SSO: Edit app

  • You can get further details about your recently added JWT application:
  • Client ID If your application provides its own client ID, you can configure it by clicking on the Customize button.
    App Secret You can find App Secret by clicking on the copy icon. This is used in the HS265 Signature algorithm for generating the signature.
    Signature Algorithm Select RSA-SHA256 as your signature algorithm from the dropdown.
    Primary Identity Provider Select the default Identity Provider from the dropdown for the application. If not selected, users will see the screen of default IdP (miniOrange)
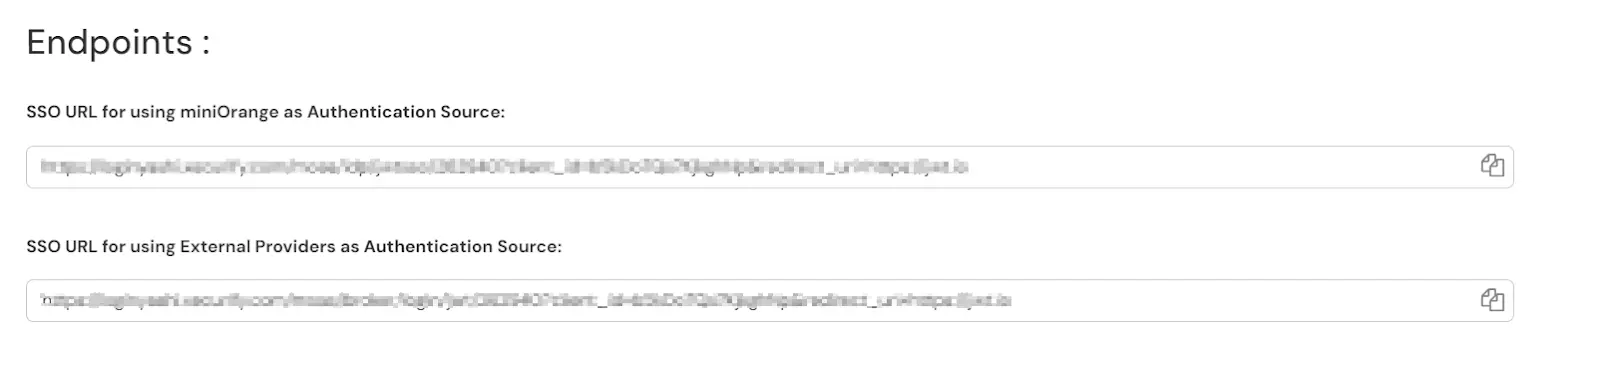
    Redirect URL Enter your app’s URL here (This is the URL where you will receive your JWT.) <app-login-url>/?id_token=<token>
    eg: https://localhost:3000/home/?id_token=eyefb43bf.whfeeg.hfwf
    In this example, https://localhost:3000/home is my app’s URL where id_token will be posted after authentication.
  • Scroll down to Endpoints.
  • React SSO: Search JWT application

  • SSO URL for using miniOrange as Authentication Source: If you are going to store users in miniOrange and use miniOrange as your authentication source,then, copy and save this URL somewhere as it will be used in further steps.
  • SSO URL for using External Providers as Authentication Source: If you are going to use any External Provider as your authentication source, then, Copy this one and save somewhere as it will be used in further step.

2. Configure SSO in React

  • Select a component that will be responsible for verifying the JWT token most preferably the login component.
  • Click on Download Connector and download miniOrange React SSO Connector from this link. Extract this folder and place it in the src folder of your app.
  • Go to Apps, Click on the 3 dots against your configured React App.
  • Click on Certificate to download the RSA256 certificate.
  • React Single Sign-On (SSO) - certificate

  • Place the downloaded certificate in the `src` folder of your react app. Make sure it’s name is RSA256Cert.crt
  • In TokenHandler.js, locate the following line. You can replace this with any other route where you want to redirect users after successful authentication.
  • navigate('/home');

  • You can use the following code snippet to retrieve the attributes from the session storage
  • sessionStorage.getItem('decodedToken');

  • You can add a button on your login screen to redirect to the SSO URL. You can get this SSO URL from previous step.
  • import React from 'react'; const Login = () => { const handleSingleSignOn = () => { const ssoUrl = 'Your SSO URL here'; window.location.href = ssoUrl; }; return ( <div> <button onClick={handleSingleSignOn}>Single Sign On</button> </div> ); }; export default Login;

  • On Clicking the SSO button the user will be redirected to chosen IdP.

3. Test SSO Configuration

Test SSO login to your React account with miniOrange IdP:

Using IDP Initiated Login

  • Login to miniOrange IdP using your credentials.
  • React Single Sign-On (SSO) login

  • On the Dashboard, click on React application which you have added, to verify SSO configuration.
  • React Single Sign-On (SSO) verify configuration

Using SP Initiated Login

  • Open your application and click the Login button configured with the SSO URL.
  • You should be redirected to the IdP (Identity Provider) login page.
  • Enter the valid user credentials stored in the IdP.
  • After entering the credentials, you should be successfully logged into your application.

Not able to configure or test SSO?


Contact us or email us at idpsupport@xecurify.com and we'll help you setting it up in no time.


4. Single Logout (Optional)

If you want to ensure that all sessions (SP and IDP) for a user are properly closed, you can configure Single Logout with the steps below.

A. Configure your JWT application with SLO endpoint:

  • You can configure the below SLO endpoint directly in your application's Logout Button:
  • https://login.xecurify.in/moas/broker/login/jwt/logout/<your-customer-id>?redirect_uri=<redirect-url>

    OR

  • Go to miniOrange Dashboard -> Apps -> Your Configured JWT APP-> Select Edit.
  • Enter your Logout URL. This will be the URL where, after logging out, the user will be redirected.
  • Save and edit your app again.
  • Scroll down to Endpoints and copy your Single Logout URL. Copy this URL and embed it in your Logout button of your app.
  • react sso single logout url

B. In case of SAML External IdP as an Authentication Source, follow the below steps to configure SLO:

    Configure miniOrange with External IdP SLO endpoint:

  • Go to the Identity Provider tab and edit the configured Identity Provider.
  • Find the option Single Logout URL and configure the SLO URL provided by your IdP.
  • react sso single logout url

    Configure IdP with miniOrange SLO endpoint:

  • Configure your Identity Provider with below Single logout endpoint.
  • https://login.xecurify.in/moas/broker/login/saml_logout/<your-customer-id>
  • You can find the SSO Binding option to configure the logout binding type to either REDIRECT or POST.

External References


x

Work Email*


 Your download should start now. If not, please email us at idpsupport@xecurify.com or contact us.

Want To Schedule A Demo?

Request a Demo


Our Other Identity & Access Management Products