Hello there!

Need Help? We are right here!

Support Icon
miniOrange Email Support
success

Thanks for your Enquiry. Our team will soon reach out to you.

If you don't hear from us within 24 hours, please feel free to send a follow-up email to info@xecurify.com

Search Results:

×

miniOrange LDAP Gateway


miniOrange LDAP Gateway allows login to miniOrange and several other applications using credentials stored in Active Directory, OpenLDAP and other LDAP servers where the LDAP Server is not publicly accessible. The LDAP Gateway is installed in the intranet's DMZ zone. This module also functions as a sync agent, keeping your identity provider in sync with the LDAP Server objects. Furthermore, the Gateway module allows you to configure numerous LDAP Servers, allowing you to specify each unique LDAP Server required for authentication.


miniorange ldap gateway architecture

Why LDAP Gateway?


  • LDAP with non public IP - This can be very beneficial if your aim is single sign on but your LDAP exists within your intranet with a non public IP. You can still authenticate your site (which could be anywhere outside your network) and with the help of this two part plugin (plugin + gateway) you can authenticate against your LDAP and achieve single sign on.
  • Secure calls using HTTPS - All remote calls happen through an encrypted channel.
  • Setup LDAP configuration once and access from multiple sites - You only need to setup your LDAP configuration once and you can access from multiple sites, thereby achieving ease of use.
  • Your LDAP stays secure since its behind your firewall.

Prerequisites

  • HARDWARE & SOFTWARE REQUIREMENTS FOR LDAP GATEWAY SERVER
    • miniOrange LDAP Gateway Server - This is the server where the miniOrange LDAP Gateway will be installed.
    Specifications miniOrange Gateway Server (minimum requirements)
    CPU Core 2 core
    RAM 4 GB
    HDD 30 GB
    OS Windows Server 2008+ or Linux Server
    Java Environment Java SE Development Kit v8 (Download Link)
    Apache Tomcat Apache Tomcat v8 Windows Service Installer (Download Link)

  • Setup JAVA (JAVA 8/ JDK 1.8)
    • For Windows Machine use : Click here to Download JAVA 8
    • For Linux Machine: Download OpenJDK 1.8.
    • For Debian, Ubuntu, etc. use sudo apt-get install openjdk-8-jre
    • For Fedora, Oracle Linux, Red Hat Enterprise Linux, etc. use su -c "yum install java-1.8.0-openjdk
  • Setup Environment Variables
    • JAVA_HOME: Set this to point to the JDK directory. Eg: C:\Program Files\Java\jdk1.8.0_221
  • PORT CONFIGURATION
    • miniOrange LDAP Gateway Server
      1. TCP Port 8080/443 - HTTP/S - should be accessible from the miniOrange Cloud (52.55.147.107)
      2. Outbound access to login.xecurify.com on TCP 443 should be allowed
    • Active Directory Domain Controller - TCP Port 389/636 - should be accessible from the miniOrange LDAP Gateway Server.

Follow the Step-by-Step Guide given below to Setup miniOrange LDAP Gateway

1. Download miniOrange Gateway

You can check the below table to download miniOrange Gateway on your operating system:

    Operating System Download Link Checksum(SHA256)
    Zip Download
    Windows Offline 32 bit Download
    Windows Offline 64 bit Download
    Windows Online Installer (32 or 64 bit) Download

2. Configure Port to run miniOrange Gateway (Optional)

  • To run miniOrange LDAP Gateway on a port other than 8080, Navigate to <miniOrange Gateway Directory>/conf and edit server.xml
  • Search for " Connector port="8080" protocol="HTTP/1.1" "
  • miniorange ldap gateway default port configuration

  • Change the port from 8080 to the required port. Eg: 80
  • Access the gateway from your browser using the url "<hostname:port>/miniorangegateway". Replace "<hostname>" with your hostname or server IP .

3. Setup SSL for LDAP Gateway (Optional)

NOTE: This step is mandatory for Chrome Browser. Chrome will not run the Web-Application on HTTP. For all the other browsers this is optional.

  • Click here to follow the steps if you have CA certificates.
  • Follow the below steps if you want don't have CA certificates.
    1. Generate Keystore:
      • Navigate to the %JAVA_HOME%\bin directory in the file explorer. Create a certs directory in it.
      • miniorange ldap gateway create certs directory

      • Navigate to the %JAVA_HOME%\bin directory in the command line ( in Administrator mode ) and execute the command:
        keytool -genkey -alias <ALIAS> -keyalg RSA -keystore <JAVA_HOME>\bin\certs\keystore.jks
      • miniorange ldap gateway execute key tool command

        This creates a keystore in the certs folder created in (a).


        miniorange ldap gateway create a keystore

    2. Configure Connector:
      This is required to configure Tomcat to run on port 443(SSL Port).
      • Navigate to the <Tomcat Directory>\conf and edit the server.xml file.
      • miniorange ldap gateway navigate to server.xml

      • Add a connector element under <Service name="Catalina">. The following configuration needs to be placed in the connector element:
        <Connector port="8443" protocol="HTTP/1.1" SSLEnabled="true" maxThreads="150" scheme="https"
        secure="true" clientAuth="false" sslProtocol="TLS" keystoreFile="<PATH_TO_KEYSTORE>"
        keystorePass="KEYSTORE_PASSWORD" />
      • miniorange ldap gateway add connector


    3. Assign Server Name to Tomcat:
      • Edit the %windows%\system32\drivers\etc\hosts file and add the following line:
        127.0.0.1 <newhostname>
      • miniorange ldap gateway assign server name

      • Navigate to the <Tomcat Directory>\conf and edit the server.xml file.
      • Search for the <Engine name="Catalina" defaultHost="localhost"> and replace localhost with the newhostname of the server.
      • miniorange ldap gateway configure new hostname

      • Search for the <Host> element and replace name=localhost with name=<IP Address/DNS> of the server.
      • miniorange ldap gateway replace new hostname

      • Restart Tomcat by running startup.bat under <Tomcat Directory>\bin. Navigate to the following address:
        https://<newhostname:port>/miniorangegateway.

4. Starting miniOrange Gateway

  • Navigate to <miniOrange Gateway Directory>/bin and start the server using the following commands in the terminal:
    1. For Windows Machine use : catalina.bat start
    2. For Linux Machine: sh catalina.sh start
  • Access the gateway from your browser using the url "<hostname:port>/miniorangegateway". Replace "<hostname>" with your hostname or server IP .
    Eg:localhost:8080/miniorangegateway.

    NOTE: If you have configured another port in Step-2, you can use that custom port instead of 8080. Eg. If you configured Tomcat to run on 8081 then the url will be Eg:localhost:8081/miniorangegateway.


5. Log into miniOrange Gateway

  • On accessing the Gateway Application in your browser. You will be redirected to admin login page.
  • miniorange ldap gateway login form

  • Enter the login credentials of your miniOrange Cloud Admin Account. [The one you use to login at login.xecurify.com].
  • After successful login you should be redirected to View LDAP Configurations page.
  • miniorange ldap gateway add ldap connection

6. Connect LDAP Gateway to Directory

  • Click on the LDAP Connection tab.
  • This should show to list of LDAP Configurations.
  • Select the Add LDAP Configuration to start configuring your LDAP information.
  • miniorange ldap gateway add ldap configuration

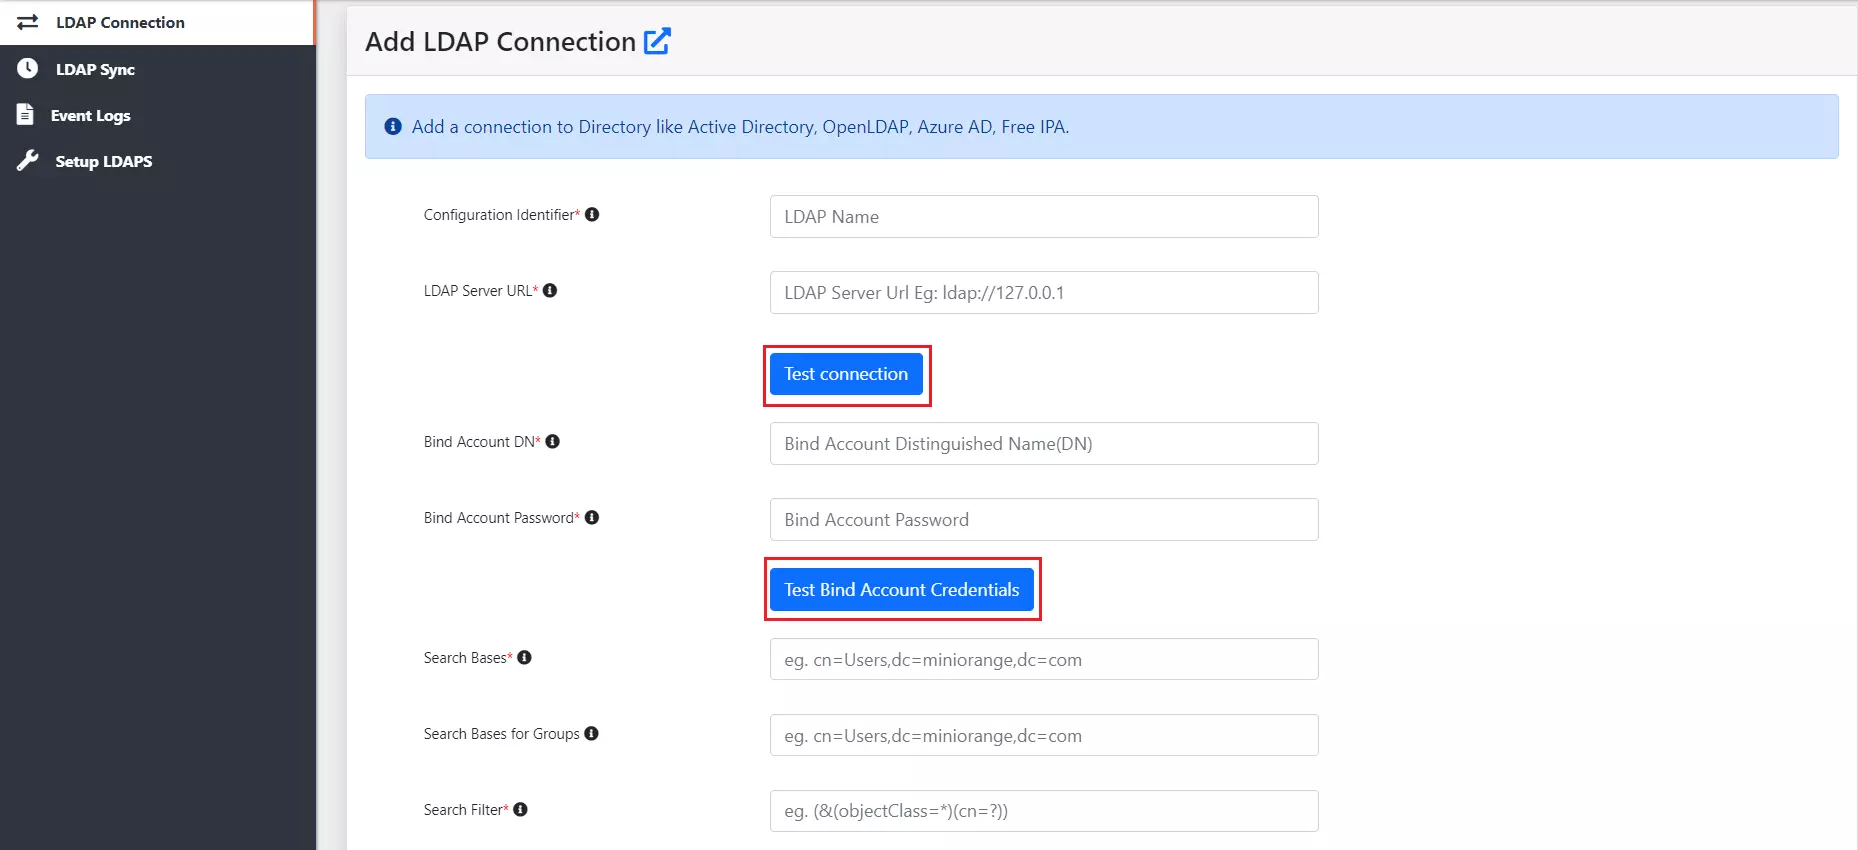
  • Configure the miniOrange Gateway by adding the following LDAP Configuration details.
  • miniorange ldap gateway configuration

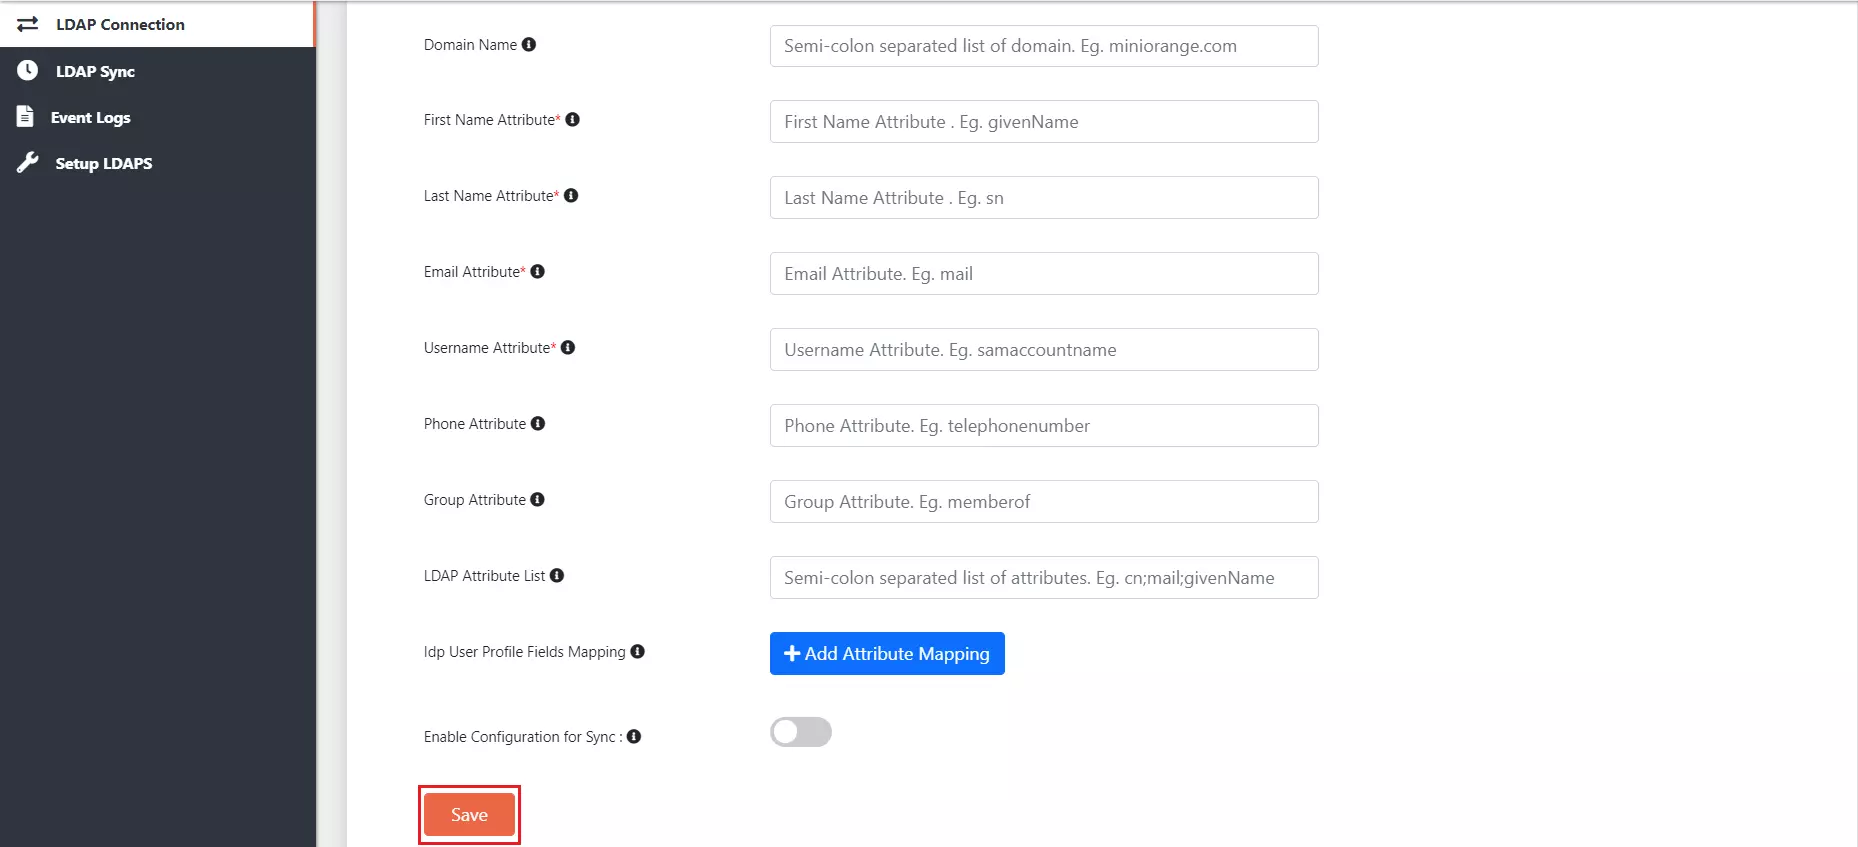
    miniorange ldap gateway configuration

    Field Description.
    Configuration Identifier Any name that will specify this set of configuration.
    LDAP Server URL Specify the host name for the LDAP server Eg: ldap://myldapserver.domain:389
    Bind Account DN This will be used to establish the connection with LDAP Server. Specify it in the following ways:
    Username@domainname or Distinguished Name(DN) format
    Bind Account Password: Password for the Bind Account in the LDAP Server
    Search Bases: Provide distinguished name of the Search Base object Eg:cn=User,dc=domain,dc=com
    Search Bases for Groups: Provide distinguished name of the Search bases objects for your groups Eg:cn=User,dc=domain,dc=com
    Search Filter: Search filters enable you to define search criteria and provide more efficient and effective searches. Eg: "(&(objectClass=*)(cn=?))"

    If you use User in Single Group Filter or User in Multiple Group Filter, replace the <group-dn> in the search filter with the distinguished name of the group in which your users are present.
    Domain Name: Semi-colon separated list of domain. Eg: miniorange.com
    First Name Attribute: LDAP attribute for the First Name. Eg: givenName
    Last Name Attribute LDAP attribute for the Last Name. Eg: sn
    Email Attribute LDAP attribute for the First Name. Eg: mail
    Username Attribute: LDAP attribute for the First Name. Eg: sAMAccountName
    Phone Attribute LDAP attribute for the First Name. Eg: telephoneNumber
    Group Attribute LDAP attribute for the Group Name. Eg: memberof
    LDAP Attribute List Semi-colon separated list of attributes. Eg: cn;mail;givenName
    IdP User Profile Fields Mapping Idp User Profile Fields which will be used during sync
    Enable Configuration for Sync This option Enables/Disables the enrollment of the current connection is Scheduler
  • Click the Save button.
  • To test the current LDAP connection, you will have to go back to LDAP Connections

7. Testing Connection and Attribute Mapping

  • To test attribute mapping, click on Select and click on Test Attribute Mapping from the dropdown.
  • miniorange ldap sync add gateway user store in cloud

  • Enter the Username and click Test.
  • miniorange ldap sync add gateway user store in cloud

  • If the test is successful, attribute of the user should be displayed.
  • To test LDAP configuration, click on Select and click on Test Connection form the dropdown.
  • miniorange ldap sync add gateway user store in cloud

  • Enter the Username and Password and click on Test.
  • miniorange ldap sync add gateway user store in cloud

  • Click on Test Bind Account Credentials button to verify your LDAP Bind credentials for LDAP connection.
  • On Successful connection with LDAP Server, a success message is shown.
  • miniorange ldap sync add gateway user store in cloud

8. Connect miniOrange Cloud to Gateway

  • Login to miniOrange dashboard from the Admin Console.
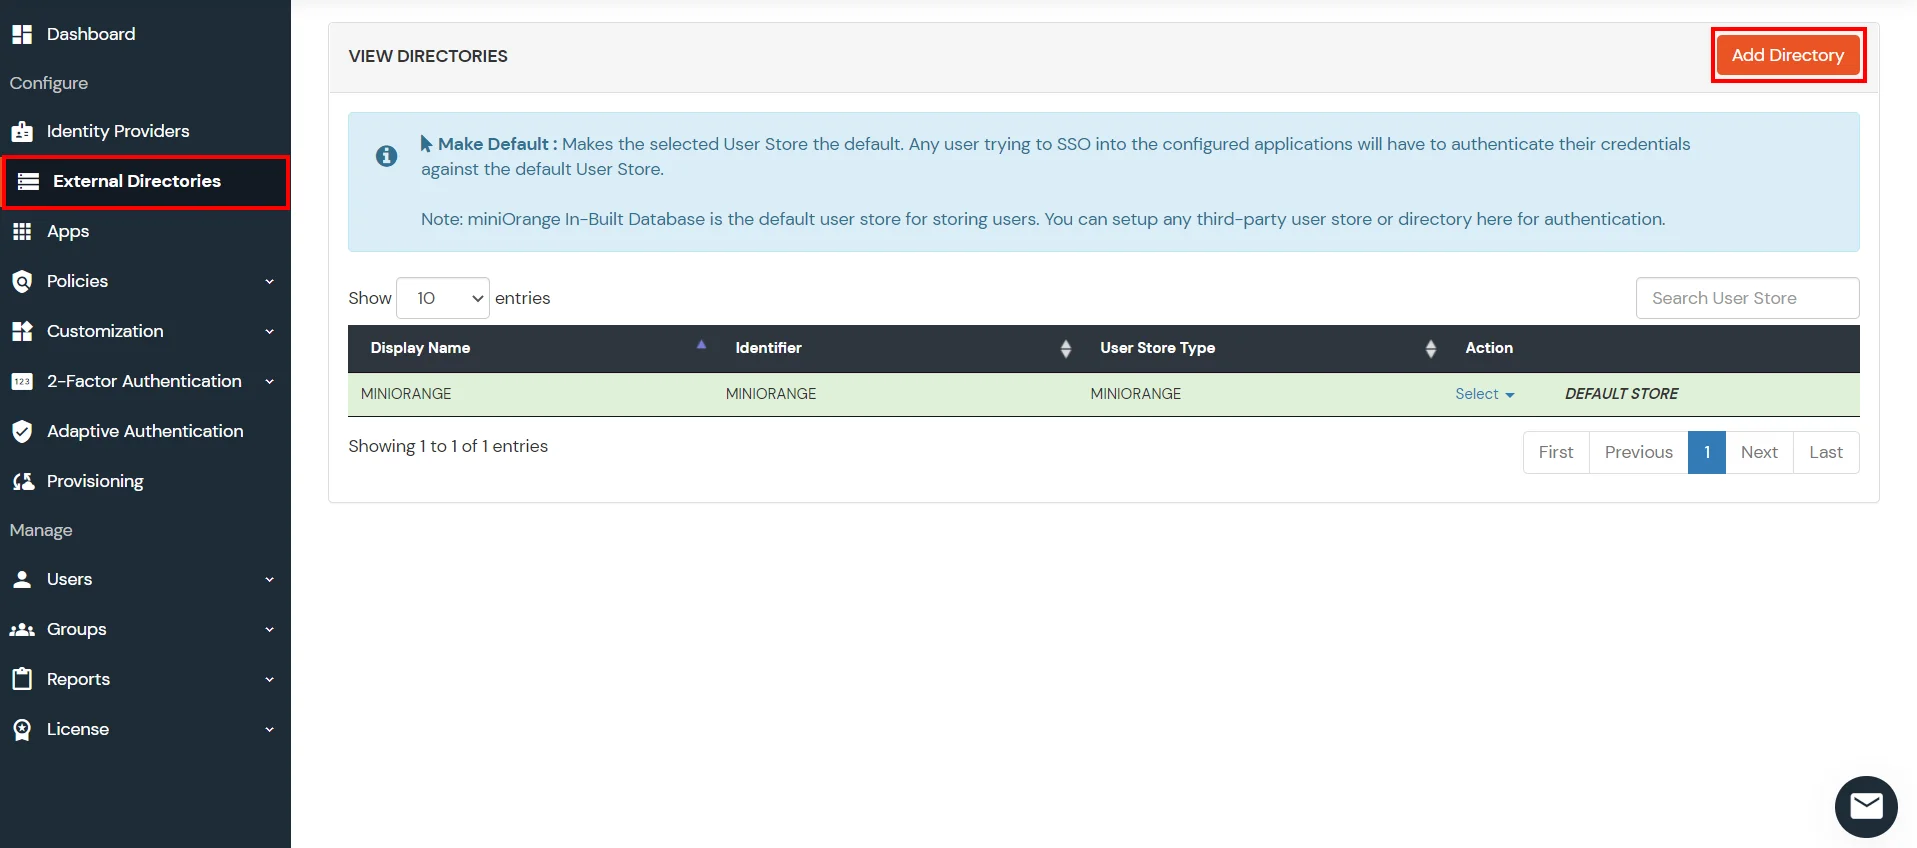
  • From the left side menu, click on User Stores >> Add User Store.
  • miniorange ldap sync add gateway user store in cloud

  • Select User Store type as AD/LDAP.
  • Select the STORE LDAP CONFIGURATION ON PREMISE option.
  • Enable the I have downloaded, installed and configured the miniOrange gateway checkbox.
  • Enter LDAP Display Name and LDAP Identifier name.
  • Select Directory Type as Active Directory.
  • Configure the Gateway URL. Select the appropriate protocol, either HTTP or HTTPS from the dropdown and configure the public url of the deployed Gateway.
    Eg:localhost:8080/miniorangegateway.
  • Enable Activate LDAP checkbox
  • miniorange ldap sync configure AD/LDAP gateway user store in cloud

  • Click on Save
  • For further information on how to configure directory in the miniOrange Cloud, you can click here.

9. Test Connection from Cloud to AD.

  • Login to miniOrange dashboard from the Admin Console.
  • From the left side menu, click on User Stores.
  • List of all the configured User-Stores will be visible. Click on the Select link of the configuration that we setup in step 7
  • Select Test-Connection from the drop-down
  • minirorange ldap gateway test cloud idp to ad connection via gateway

  • A pop-up will appear. Enter valid username and password and click on Test.

  • minirorange ldap gateway test ldap connection popup

  • On Successful connection with LDAP Server, a success message is shown.
  • minirorange ldap connection successful

10. Setting up One-Time/Scheduled Sync between Directory and miniOrange

    NOTE: This step is optional. Follow the below steps if you want to setup user sync between your Directory and the miniOrange Cloud service via LDAP Gateway. We support both, scheduled sync as well as One Time Sync.

    Eg. If the server time is 13:00 then anytime before 13:00 should initiate immediate sync.

  • Click On Schedules from the left Pane.
  • Configure the following details:
  • Field Description.
    Enable Group Sync Enable/Disable group sync.
    Enable User Sync Enable/Disable user sync
    Enable User Group Membership Sync Enable/Disable user group membership sync
    Enable Delete User Sync Enable/Disable to delete user sync.
    Configure Exclusion List Click on Select Users to select Users who are excluded from being deleted.
    Mark User as Registered in miniOrange Enable/Disable marking user as registered in miniOrange.
    Start Time(hh:mm) Start time for the schedule sync Eg: 01 in hours and 01 in minutes.
    Sync Interval (in hrs) Time Interval between periodic sync.


    miniorange ldap gateway schedules configuration

  • Click on Save
  • The users from various LDAP configurations will be synced based on whether "Enable Configuration for Sync" is enabled
  • If you enable Enable Delete User Sync, click on Select Users and select the Users which are excluded from being deleted.
  • miniorange ldap gateway schedules configuration

  • Now select the Enable LDAP Sync tab.
  • miniorange ldap gateway schedules configuration

  • Select Run One-time-Sync to immediately perform the sync.
  • Select Enable Scheduled Sync to start sync at scheduled time.
  • You can disable sync after starting it by clicking on Disable Scheduled Sync.
  • miniorange ldap gateway schedules configuration

11. Steps to setup Secure LDAP (LDAPS) connection with LDAP Directory.

    NOTE: Make sure that the Tomcat is running with the Admin Privileges.
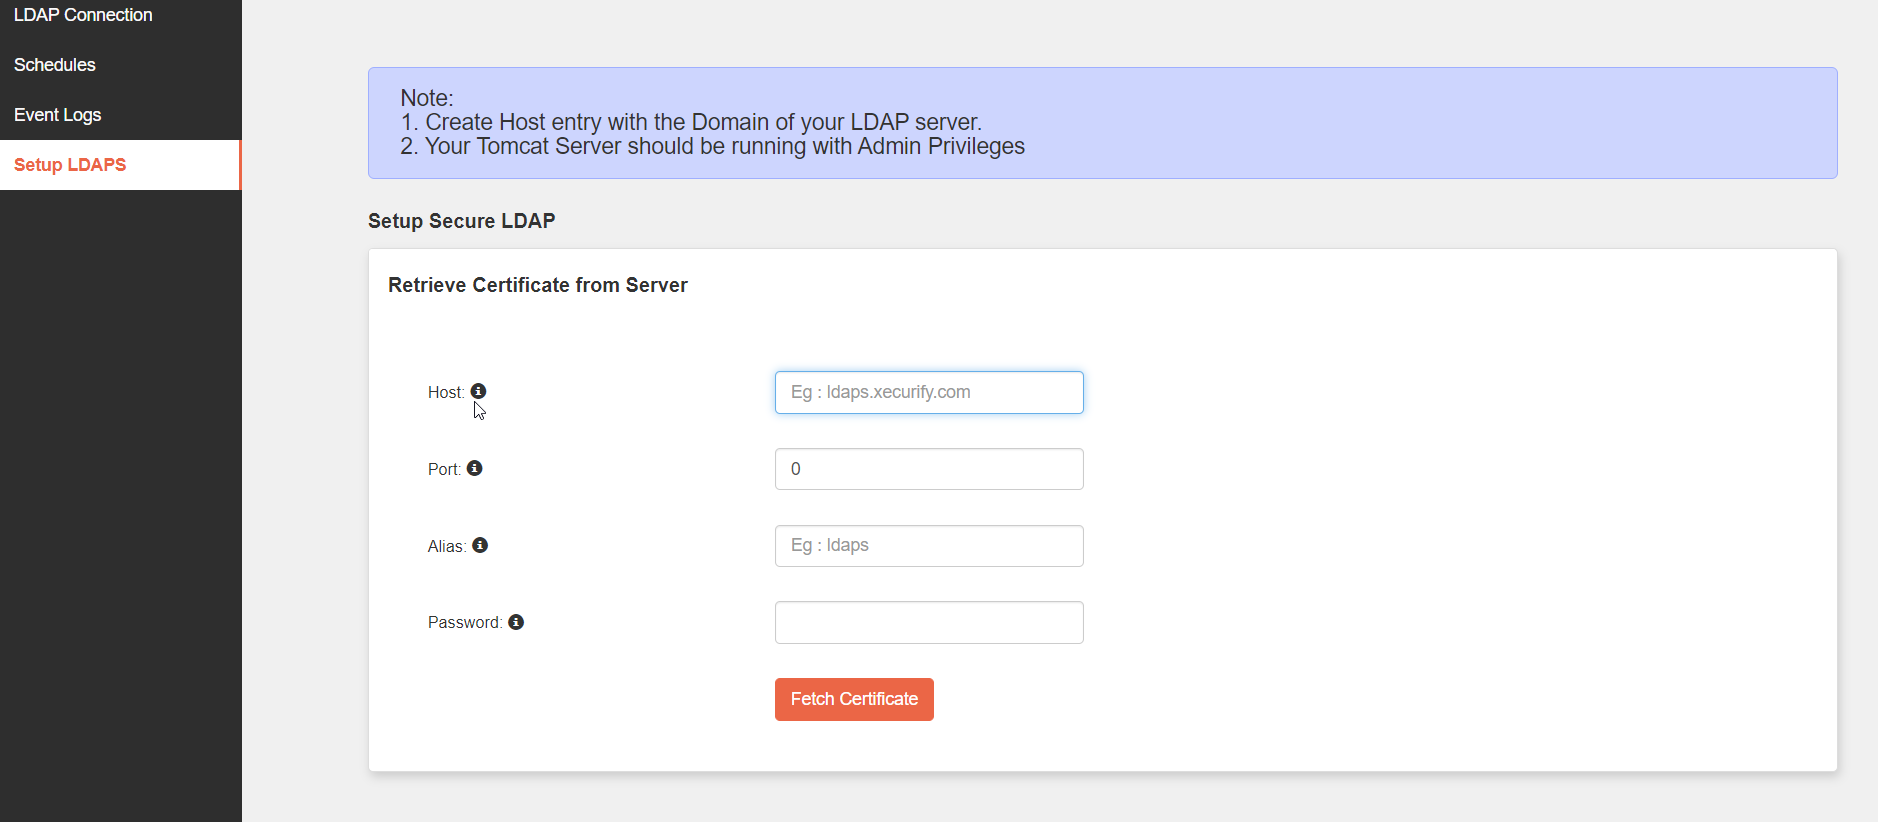
  • Navigate to the Setup LDAPS Option form the left pane.
  • Enter the required details:
    • Host: Hostname of your LDAP Domain Controller.
    • Port: Secure LDAP Port. Eg: 636
    • Alias: Alias with which you want to store the incoming certificate in your Java TrustStore.
    • Password: Password of your Java TrustStore.
  • Click on Fetch Certificate. You should see a success message on successful fetch of the certificate.
  • miniorange ldap gateway retrieve certificate

  • Restart the Tomcat Server.

12. Steps to deploy tomcat as Windows/Linux service


  • Install Tomcat as a Windows Service using a Windows Installer.
  • Navigate to the Tomcat Package that was provided by us and copy over the miniorangegateway folder under the webapps directory to the newly installed Tomcat as a service webapps folder.
  • miniorange ldap gateway Deploy tomcat

  • Now you can navigate to the windows services panel and start the Tomcat service.
  • Create and open the unit file by running this command:
  • sudo vi /etc/systemd/system/tomcat.service
  • Paste in the following script. You may also want to modify the memory allocation settings that are specified in CATALINA_OPTS:
  • # Systemd unit file for tomcat [Unit] Description=Apache Tomcat Web Application Container After=syslog.target network.target [Service] Type=forking Environment=JAVA_HOME= <Location of your JRE> Eg: /usr/lib/jvm/jre Environment=CATALINA_PID=<Location of your PID file> Eg:/opt/miniorangegateway-1.x.x/temp/tomcat.pid Environment=CATALINA_HOME=<Location of your miniOrange Tomcat Directory> Eg: /opt/miniorangegateway-1.x.x Environment=CATALINA_BASE=<Location of your miniOrange Tomcat Directory> Eg: /opt/miniorangegateway-1.x.x Environment='CATALINA_OPTS=-Xms512M -Xmx1024M -server -XX:+UseParallelGC' Environment='JAVA_OPTS=-Djava.awt.headless=true -Djava.security.egd=file:/dev/./urandom' ExecStart=/opt/tomcat/bin/startup.sh ExecStop=/bin/kill -15 $MAINPID User=tomcat Group=tomcat UMask=0007 RestartSec=10 Restart=always [Install] WantedBy=multi-user.target

  • Save and exit. This script tells the server to run the Tomcat service as the tomcat user, with the settings specified.
  • Now reload Systemd to load the Tomcat unit file:
  • sudo systemctl daemon-reload
  • Now you can start the Tomcat service with this systemctl command:
  • sudo systemctl start tomcat
  • Check that the service successfully started by typing:
  • sudo systemctl status tomcat
  • If you want to enable the Tomcat service, so it starts on server boot, run this command:
  • sudo systemctl enable tomcat

13. Steps to Upgrade miniOrange Gateway

  • Download the latest version of miniOrange Gateway.
  • Stop the miniOrange Gateway Server.
  • Navigate to your current Tomcat Installation Directory and take backup of your current miniorangegateway directory present in <tomcat-root>\webapps.
  • miniorange ldap gateway schedules configuration

  • Now replace the miniorangegateway folder in the Tomcat Root Directory with the miniorangegateway folder present in the downloaded package.
  • Now copy over the \miniorangegateway\WEB-INF\classes\application.properties file from backup miniorangegateway to the newly deployed miniorangegateway in the same path \miniorangegateway\WEB-INF\classes\.
  • Start the Tomcat Server.

Want To Schedule A Demo?

Request a Demo


Our Other Identity & Access Management Products